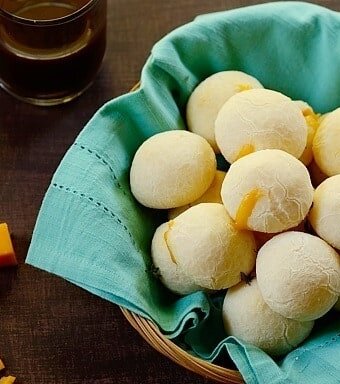
Cheese Rolls (Gluten-Free)
Equipment
- oven
- baking sheet
- bowl
Ingredients
- 2 cups tapioca flour 250 g
- ½ cup whole milk 120 ml
- ¼ cup plus 1 tablespoon vegetable oil use extra to grease hands
- ½ teaspoon salt
- 1 large egg at room temperature
- 3.5 oz queso fresco crumbled, about 100 g
- 2 tablespoons grated Parmesan cheese
- ½ teaspoon dried thyme optional
- 15 cubes medium or sharp Cheddar cheese for the filling ⅓ to ½-inch
Instructions
- Line a large baking sheet with parchment paper. Preheat the oven to 350° F (180° C).
- Place the tapioca flour in a large bowl and set aside.
- In a small saucepan, mix the milk, oil, and salt together and bring to a boil. Pour the hot liquid mixture into the reserved bowl of flour, stirring well with a wooden spoon. Let it cool just enough to handle it using your hands.
- Mix in the egg, and then add the crumbled queso fresco and grated Parmesan. Sprinkle the thyme if desired. Knead the dough for about 2-3 minutes or until homogeneous. If needed, add more tapioca flour, spoonful by spoonful, until the dough does NOT stick in your hands anymore!
- Lightly grease your hands with vegetable oil. Using a tablespoon as measurement, make balls of dough and open an indentation in the center to fill in with a cube of cheddar.
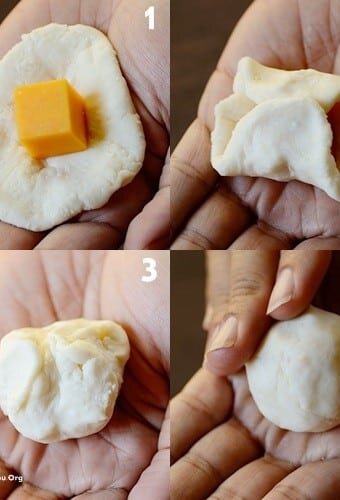
- Close the dough around the cheese cube, seal tightly, and shape it into a round ball, making sure there aren't any gaps where the cheese is exposed.
- Place the rolls on the lined baking sheet and bake for 15 to 18 minutes or until they begin to lightly brown. Serve while warm accompanied by coffee, guaraná soda, caipirinha, or other beverage of your choice.
Recipe Video
Recipe Notes
Nutrition
** Nutrition labels on easyanddelish.com are for educational purposes only. This info is provided as a courtesy and is only an estimate, since the nutrition content of recipes can vary based on ingredient brand or source, portion sizes, recipe changes/variations, and other factors. We suggest making your own calculations using your preferred calculator, based on which ingredients you use, or consulting with a registered dietitian to determine nutritional values more precisely.
Please note that health-focused and diet information provided on easyanddelish.com is for educational purposes and does not constitute medical advice, nor is it intended to diagnose, treat, cure, or prevent disease. Consult with your doctor or other qualified health professional prior to initiating any significant change in your diet or exercise regimen, or for any other issue necessitating medical advice.