Easy Sourdough Bread Recipe
Equipment
- 1 large bowl
- 1 Proofing basket/banneton
- 1 Dutch oven
- 1 Parchment Paper
- 1 Dough scraper (optional)
- 1 Rubber Spatula
Ingredients
- ½ cup active and bubbly sourdough starter or 100 grams (NOTE: You can either buy a fresh sourdough starter and follow the instructions on how to feed it before making your sourdough bread, or you can make your own sourdough starter at home. If you make yours from scratch, it may take about 7-14 days to get active and bubbly depending on how hot or cold is your environment. If below 70 degrees F, it will take longer to get active. But if you buy the fresh starter ready, it will take a few days only to get bubbly because you will be first feeding it only. Make sure to FEED your starter with the same type of flour or it may affect the texture and color of your final starter. But you can make the starter at first with whole wheat bread flour)
- 1 ½ cups + 1 tablespoon warm water or 375 grams. TIP: Use bottled water if your tap water is so heavily treated that you can smell the chemicals.
- 4 cups + 2 tablespoons bread flour or 500 grams (NOTE: Bread flour is available in white and whole wheat varieties, and has a higher protein content than all-purpose flour, usually 11-13%. It's called “bread flour” because most bread requires higher amounts of protein to produce a great amount of gluten. I used the white variety! Although you can replace it with all-purpose flour, using a ratio of 1:1, be aware your sourdough bread will be less chewer than the one made with bread flour. To make gluten-free sourdough bread, use gluten-free flour pre-mixed with xanthan gum. For making whole-wheat sourdough bread, use whole-wheat flour. The ratio is not necessarily 1:1.
- 2.5 teaspoons fine sea salt or 12 grams
Instructions
- TIP: Preferably, make the sourdough bread dough in the evening (2.5 hours) before heading to bed. This will help the bulk fermentation (8-10 hours) happen overnight and will save you time.
- Make the dough: In a large bowl, mix together the sourdough starter and warm water with a rubber spatula until fully incorporated. Then add in the bread flour and salt, mixing until thoroughly combined. Cover with a thin, damp towel (e.g. a tea towel or flour sack towel ) and let it rest for 30 minutes.
- Stretch and fold: After 30 minutes, grab the side of the dough and fold it up and inwards toward the center (as if folding paper into an envelope.) Continue to fold all around the dough – about 4-5 times.
- Then, let it rest for extra 30 minutes. Make sure to repeat this fold every 30 minutes for a total of 4 times – which will take about 2 hours. But If you don’t have 2 hours to spend, just do it the first time and proceed to the next step!
- Bulk fermentation (first rise): Cover the bowl with a dry thin towel, and allow it to rest at room temperature around (70°F or 20°C) for 8-10 hours, or until the dough has just doubled in size or just under. If your home is in a warm, humid environment, it may go quicker than 8 hours, while a colder environment may take longer to proof.
- You may find a container with straight sides to be easiest to use to watch for when it has doubled in size. A general rule of thumb is to go by visual cues rather than the actual clock. TIP: You can find a warmer spot in your kitchen such as atop a fridge or inside the microwave or oven (with the light on).
- Shape: Gently turn out the dough onto a lightly floured surface. Use your hands to cup the sides of the dough to form it into a round shape or a ball of dough. TIP: You can gently pull the edges out and tuck them under to help shape the dough. Use a dough scraper to help you with this process. Let the dough rest for extra 30 minutes.
- Proof (second rise): Prepare an 8”(20cm) bowl or banneton (proofing basket) by placing a towel on the bottom, and lightly sprinkling with flour. Carefully transfer your bread to the proofing basket, seam up. Allow it to proof in the basket for an additional 1 to 2 hours at room temp.
- Cut a piece of parchment paper to fit inside a dutch oven. You want it to extend up the sides, but not get in the way when you secure the lid. The parchment paper will help you to transfer the bread dough to the hot dutch oven without burning yourself. Preheat the oven to 550°F (290°C) and place the dutch oven inside to heat up.
- Score: Once the oven is preheated, place the parchment paper over the top of the proofing basket and flip the basket upside down to remove the dough carefully. Use a small razor blade to cut into the dough so the steam escapes while baking. A simple “C” or “X” on the top works fine! Use the parchment paper to transfer the dough to the dutch oven.
- Bake: Lower the oven temperature to 450°F (230°C). Cover the top of the dutch oven and bake your loaf of bread for 30 minutes. After 30 minutes, remove the lid and bake for extra 10-15 minutes, or until golden brown.
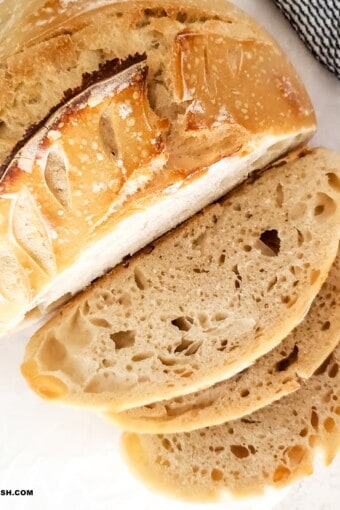
- Allow your sourdough bread to cool on a wire rack for at least an hour before slicing.
Recipe Notes
Long-Term Storage for Bread Starter
The best way to put your sourdough starter on hold to bake your bread in the summertime instead, for example, is to dry it out.Nutrition
** Nutrition labels on easyanddelish.com are for educational purposes only. This info is provided as a courtesy and is only an estimate, since the nutrition content of recipes can vary based on ingredient brand or source, portion sizes, recipe changes/variations, and other factors. We suggest making your own calculations using your preferred calculator, based on which ingredients you use, or consulting with a registered dietitian to determine nutritional values more precisely.
Please note that health-focused and diet information provided on easyanddelish.com is for educational purposes and does not constitute medical advice, nor is it intended to diagnose, treat, cure, or prevent disease. Consult with your doctor or other qualified health professional prior to initiating any significant change in your diet or exercise regimen, or for any other issue necessitating medical advice.