

Richly spiced Brazilian Pão de Mel combines tender chocolate honey cakes with a thick dulce de leche filling and a smooth chocolate coating for a delicious traditional dessert.
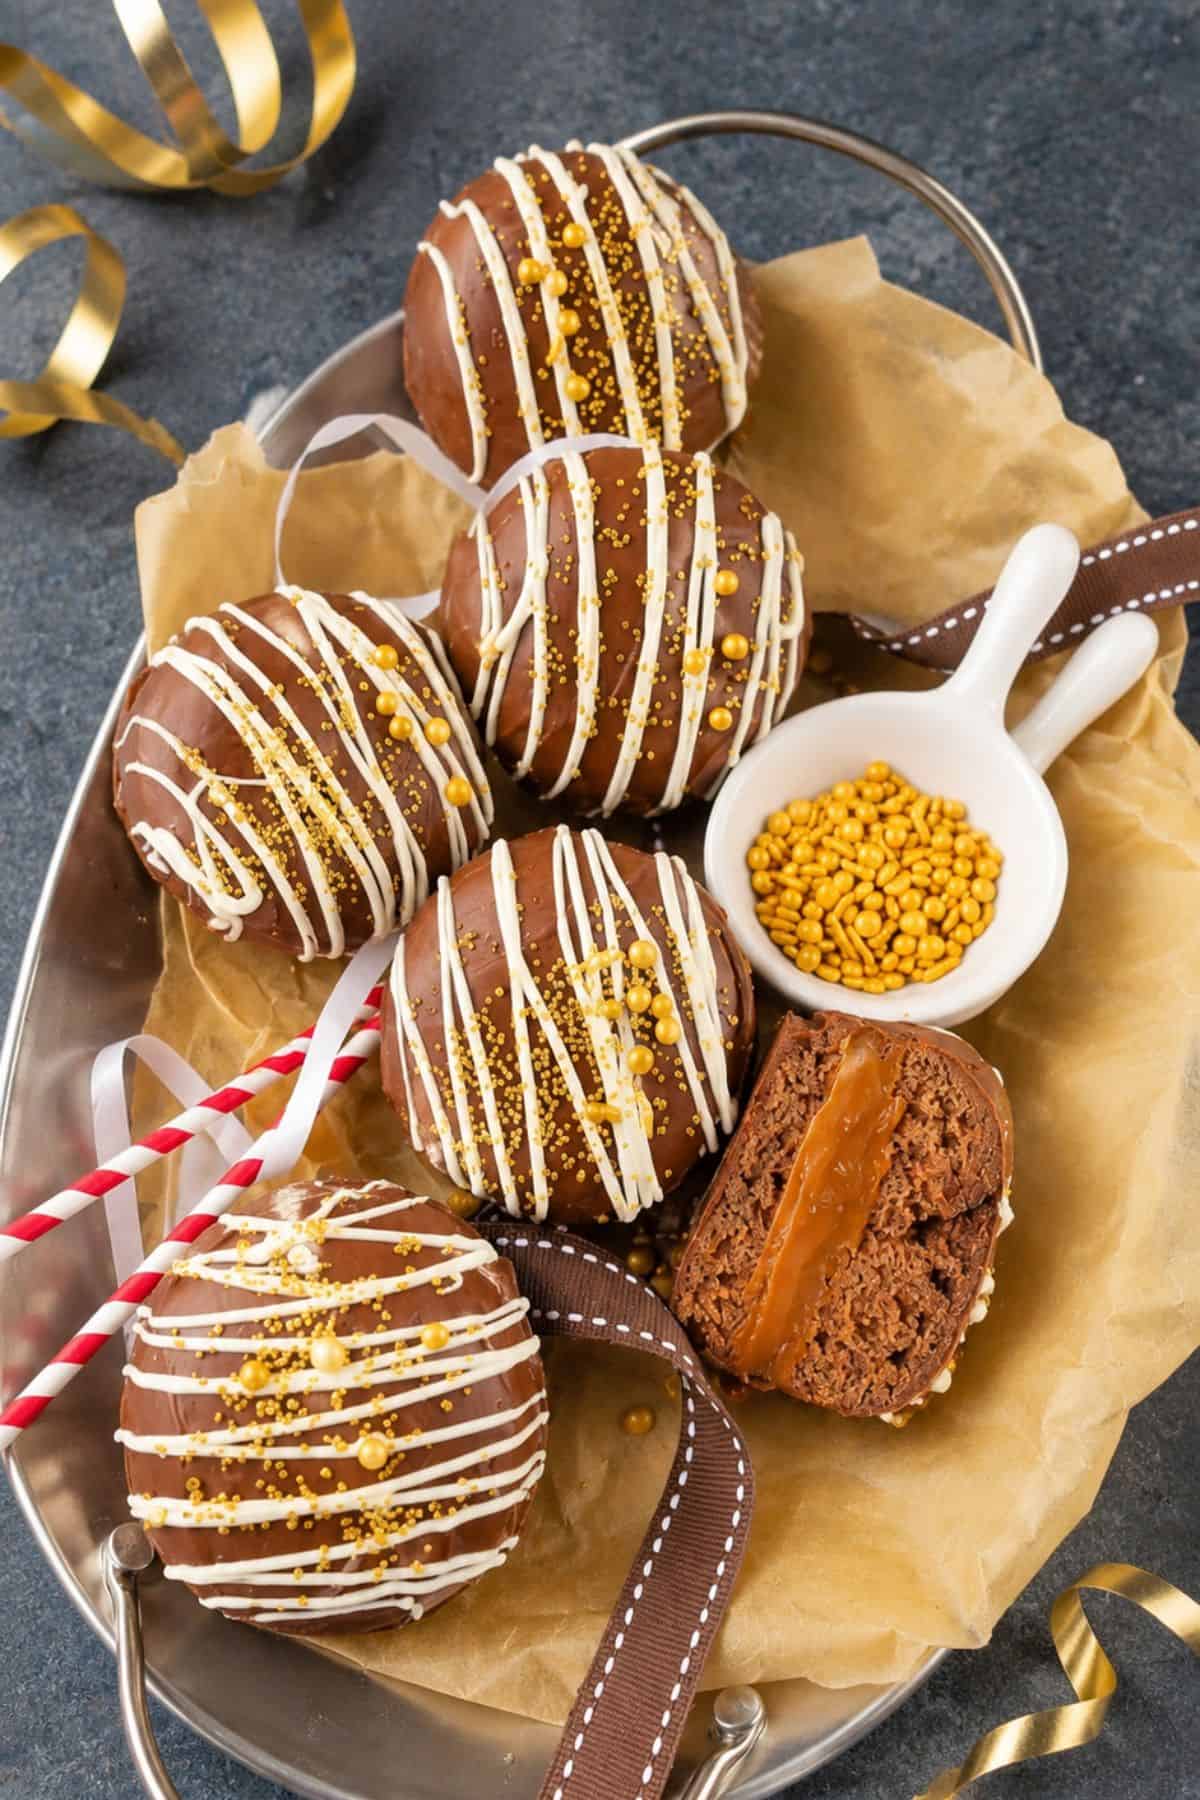
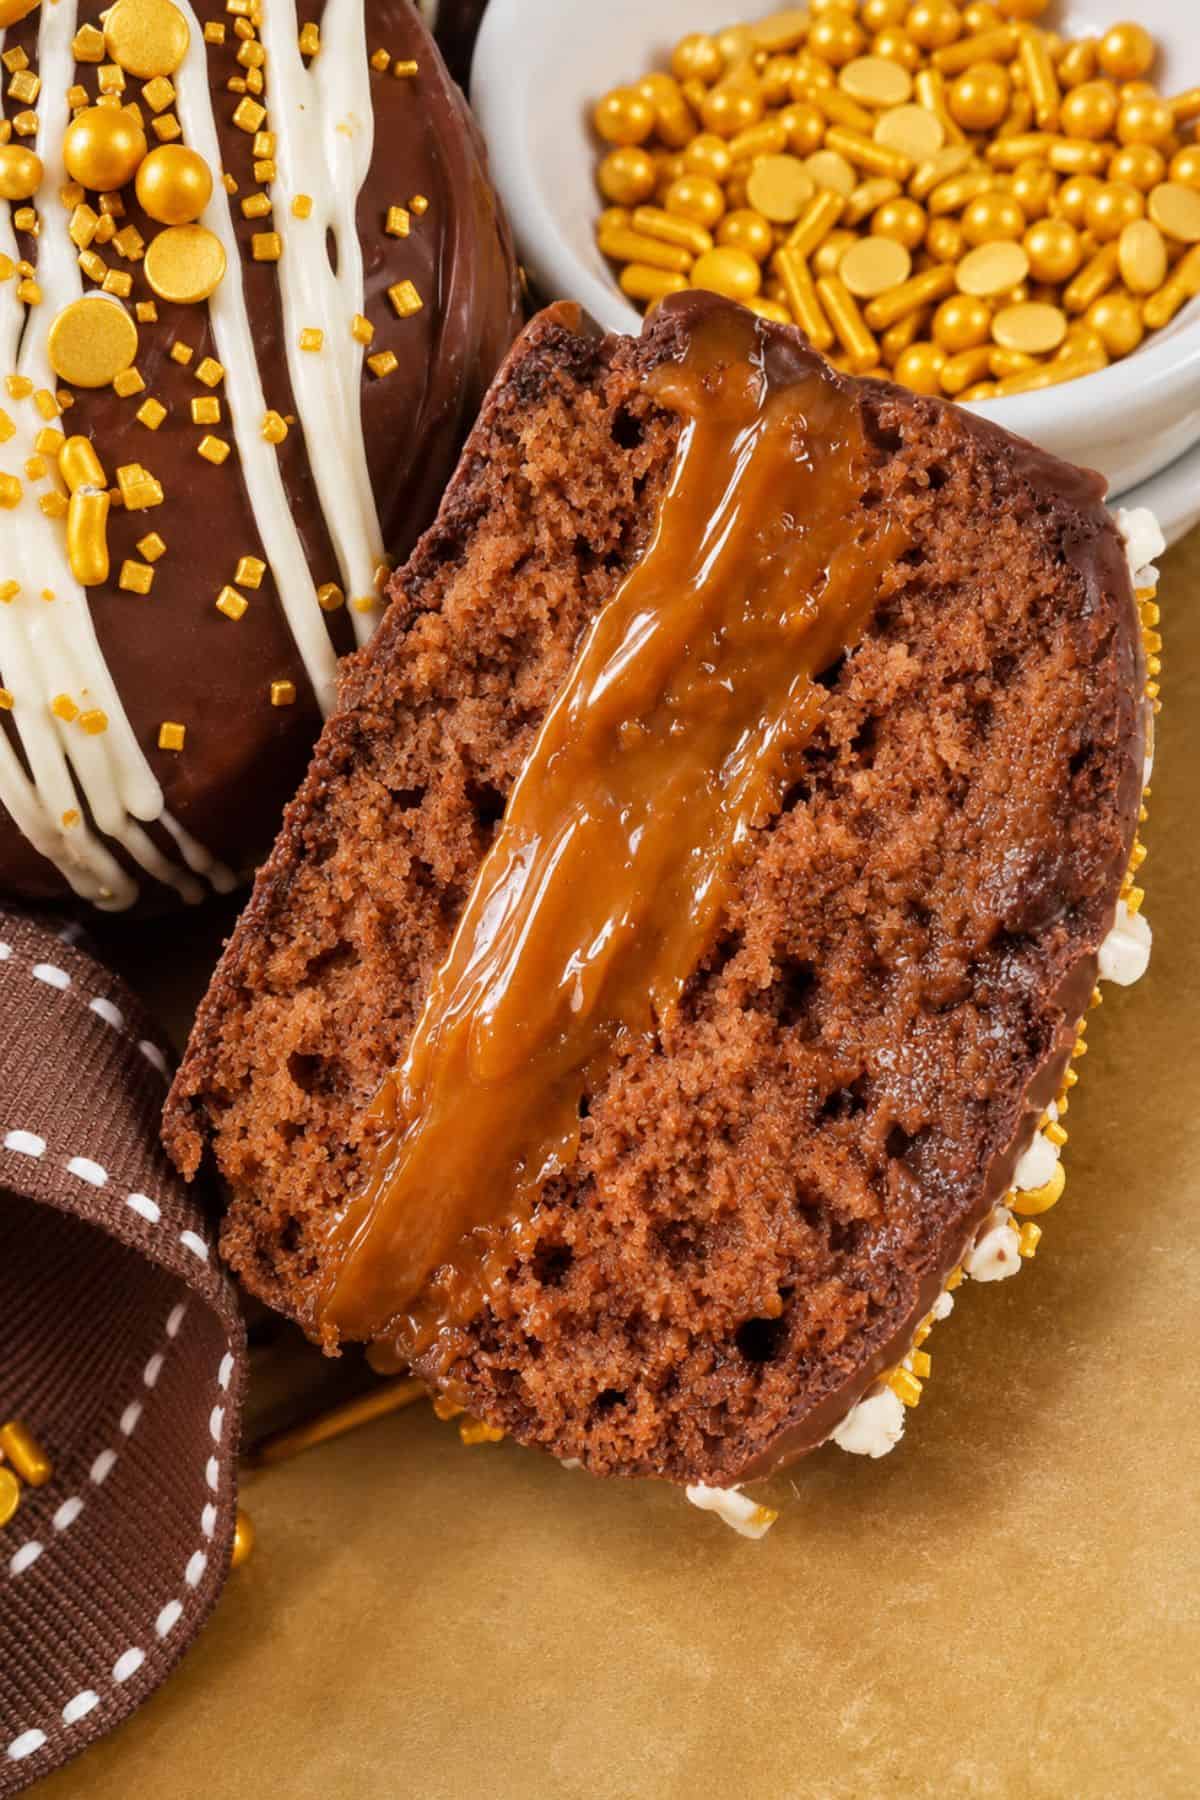
Brazilian honey cakes, also known as Pão de Mel, are soft, spiced chocolate cakes filled with creamy dulce de leche and covered in rich bittersweet chocolate. Honey and spices are infused into warm milk to bring out their flavors before baking. The cakes are baked in muffin tins, then gently flattened to make them easier to slice and fill. They make a delicious dessert or homemade gift, especially for holidays and celebrations. If you enjoy Brazilian sweets, try our brigadeiros, coconut kisses, or check out our traditional Brazilian foods.
Quick Look: Pão de Mel
- ⏱️ Prep Time: 32 minutes
- 🔥 Cook Time: 18–20 minutes for standard-size cakes or 10–12 minutes for mini cakes
- ⏲️ Total Time: 50 minutes
- 🍽️ Servings: 12 standard-size or 24 mini cakes
- 🍫 Flavor Profile: Chocolate, honey, cinnamon, cloves, nutmeg, and optional ginger
- 🍰 Texture: Soft, moist spiced cake with a creamy dulce de leche filling and chocolate coating
- 🍯 Key Ingredients: Honey, cocoa powder, brown sugar, spices, dulce de leche, and bittersweet chocolate
- 🥣 Cooking Method: Baked in a muffin tin, filled with dulce de leche, and dipped in melted chocolate
- 🎁 Best For: Desserts, birthdays, holidays, wedding favors, and edible gifts
- 👩🍳 Difficulty: Intermediate, mainly due to filling and coating the cakes
- Why This Recipe Works: Infusing honey and spices into warm milk gives the cakes more flavor. Mixing the batter just until combined keeps the cakes tender, and flattening their tops after baking makes them easier to fill.
SUMMARIZE & SAVE THIS CONTENT ON
Jump to:
- Quick Look: Pão de Mel
- What Is Pão de Mel?
- Chef's Notes from Valentina
- Ingredients
- Substitutions And Additions
- How to Make Pão de Mel
- How to Temper Chocolate
- Expert Tips for Pão de Mel
- FAQ About Pão de Mel
- What to Serve with Pão de Mel
- More Brazilian Sweets to Try
- Pão de Mel (Brazilian Honey Cakes)
- Storage and Freezing
What Is Pão de Mel?
Pão de Mel means honey bread in Portuguese, but it's actually more like a soft, spiced chocolate cake. Also called Brazilian gingerbread or Brazilian honey cake, it's made with honey, cocoa, cinnamon, cloves, and nutmeg. The cakes are usually round or square, filled with dulce de leche or brigadeiro, and covered in chocolate. Some versions skip the filling altogether. You might also see them called Brazilian honey bread or pães de mel, the plural name in Portuguese.
No one knows exactly where pão de mel came from. Some believe it was inspired by Russian pryaniki, a honey and spice treat. Others trace it to European spiced cakes. You'll find pão de mel in bakeries and cafés across Brazil. Unlike American gingerbread, which people usually associate with Christmas, Brazilians enjoy these little cakes all year long.
Ingredients
- Honey – ½ cup. Keeps the cakes moist and adds a gentle sweetness. You can use pure maple syrup instead, but the flavor will differ from traditional pão de mel.
- Unsweetened cocoa powder – 3 tablespoons, sifted. Gives the cakes their chocolate taste without extra sweetness. Use unsweetened baking cocoa rather than hot chocolate mix.
- Dulce de leche – 1 can (13.4 oz). Adds a thick, creamy caramel filling that pairs well with the spiced chocolate cake. Choose a spreadable variety that stays between the layers.
- Bittersweet chocolate chips – 4 cups. Make a rich chocolate coating that contrasts with the sweet filling. Milk chocolate also works if you prefer a sweeter finish.
- Ground ginger – ½ teaspoon, optional. Adds a little extra spice and a hint of gingerbread flavor. Leave it out for a milder taste.
- Light brown sugar – ¾ cup. Adds a mild molasses flavor and helps keep the cakes soft and moist.
- Whole milk – ¾ cup. Brings richness to the batter and helps draw out the flavor of the honey and spices. Unsweetened almond or soy milk can work as alternatives.
- Eggs – 2 large eggs plus 1 egg yolk. Help the cakes hold together and give them a tender crumb. The extra yolk adds richness.
- Vegetable oil – ⅓ cup. Keeps the cakes moist and tender after baking. Canola oil works just as well.
- All-purpose flour – 1 ½ cups, sifted. Gives the cakes enough structure to slice and fill without crumbling.
- Vegetable oil – ½ tablespoon, optional. Keeps the melted chocolate fluid and easier to work with during dipping. Skip it if you plan to temper the chocolate.
How to Make Pão de Mel
Prepare the Batter
- Prepare the oven and muffin tin: Preheat the oven to 350°F (180°C). Grease a mini or standard-size muffin tin and dust the cups with cocoa powder or flour. Set aside.
- Infuse the milk and spices: Combine the milk, cinnamon, cloves, nutmeg, optional ginger, and honey in a small saucepan over medium heat. Stir and bring to a quick boil. Remove from the heat, cover, and let sit for 10–20 minutes.
- Blend the wet ingredients: Let the milk mixture cool until warm, not hot. Pour it into a blender with the eggs, egg yolk, brown sugar, vanilla extract, and vegetable oil. Blend for 15–20 seconds, just until combined.
- Mix the batter: Combine the sifted cocoa powder, baking powder, baking soda, and flour in a large bowl. Pour in the blended mixture and whisk just until combined. Avoid overmixing.
Bake and Flatten the Cakes
- Fill and bake: Divide the batter evenly among the prepared muffin cups, filling them about halfway. Bake on the middle oven rack for 10–12 minutes for mini cakes or 18–20 minutes for standard-size cakes, until a toothpick inserted into the center comes out clean.
- Unmold the cakes: Run a knife around the edges to loosen them. Carefully invert the cakes onto a large, flat platter or clean baking sheet while they're still hot, with their rounded tops facing down.
- Flatten the tops: Place another baking sheet over the inverted cakes, then set something heavy, such as a cast-iron skillet, on top. This helps flatten the rounded tops and works best while the cakes are still hot.
- Rest and slice: Leave the cakes under the weight for 5–10 minutes. Remove the weight, then slice each cake in half horizontally.
Fill and Coat the Pão de Mel
- Add the dulce de leche: Spread or pipe dulce de leche onto one half of each cake. Place the other half on top to make a sandwich, similar to a whoopie pie.
- Melt the chocolate: Place the bittersweet chocolate chips in a large microwave-safe bowl. Microwave in 30-second intervals, stirring after each interval, until melted, about 1 ½–2 minutes in total. Stir until smooth.
Note: If needed, stir in the optional vegetable oil to keep the melted chocolate from hardening too quickly. - Coat the cakes: Place each Brazilian honey cake on a fork and dip it into the melted chocolate. Smooth the chocolate over the top and sides, then transfer to a wire rack set over a baking sheet or a parchment-lined baking sheet. Let the excess chocolate drip off. Refrigerate for 3–5 minutes, until the coating hardens.
- Trim and decorate: Use a paring knife to trim any excess hardened chocolate from the bottom edges. Serve as they are, or decorate with melted white chocolate and sprinkles.
How to Temper Chocolate
Why Temper Chocolate?
Tempering gives chocolate a smooth, glossy finish and a firm snap when you bite into it. It also helps the coating set evenly and makes it less likely to melt on your fingers.
Tempering is optional for Pão de Mel. Regular melted chocolate works for this recipe, but tempering gives the cakes a more polished finish, especially if you're making them as gifts.
The Seeding Method
- Prepare the chocolate: If using chocolate bars, chop them into small, even pieces. Set aside ⅓ of the chocolate and use the remaining ⅔ for melting.
- Melt the chocolate: Place ⅔ of the chocolate in a dry, heatproof bowl over a saucepan of gently simmering water. Make sure the bowl doesn't touch the water. Heat dark chocolate to 120–122°F (49–50°C) or milk chocolate to 115–117°F (46–47°C). Stir gently and check the temperature with a digital thermometer.
- Add the remaining chocolate: Remove the bowl from the heat and gradually stir in the reserved ⅓ of the chocolate. Continue stirring until the chocolate melts and begins to cool.
- Check the temperature: Let dark chocolate cool to 88–90°F (31–32°C) or milk chocolate to 86–88°F (30–31°C). Once the chocolate reaches the correct temperature and looks smooth, it's ready for dipping.
- Test the chocolate: Spread a little chocolate onto parchment paper or a clean spatula. It should begin to set within a few minutes and develop a smooth, glossy finish.
- Keep the chocolate at the right temperature: Stir occasionally as you dip the cakes. If the chocolate starts to thicken, warm it gently for a few seconds without going above the recommended working temperature.
Note: Keep the bowl and utensils completely dry because water can cause melted chocolate to seize. Skip the optional vegetable oil when tempering, and use real chocolate suitable for tempering rather than compound chocolate coating.

FAQ About Pão de Mel
Overbaking can dry out these small cakes quickly. Check them near the end of the recommended baking time and remove them once a toothpick inserted into the center comes out clean.
Yes. Use a hand mixer to combine the cooled milk mixture with the eggs, sugar, vanilla, and oil. Mix just until combined, then whisk the wet mixture into the dry ingredients without overmixing.
Underbaking or opening the oven too early can cause the centers to sink. Check that the cakes are fully baked before removing them from the oven, and avoid opening the oven door during the first part of baking.
Besides dulce de leche, try Nutella, creamy peanut butter, marshmallow creme, orange marmalade, or thick apple or pear preserves. Choose a thick filling that stays between the cake layers.
What to Serve with Pão de Mel
- Coffee and Espresso: Serve Pão de Mel with black coffee, espresso, or cappuccino. The slightly bitter coffee pairs well with the sweet dulce de leche filling and rich chocolate coating.
- Tea: Black tea, chai, or orange-spiced tea complements the cinnamon, cloves, and nutmeg in the cakes. Unsweetened tea works particularly well if you prefer a less sweet pairing.
- Cold Drinks: Serve with Brazilian lemonade for a refreshing, tangy contrast to the rich chocolate and dulce de leche filling.
- Fresh Fruit: Serve with strawberries, raspberries, or orange slices for a refreshing contrast to the rich chocolate and dulce de leche.



Did You Love This Recipe? If you make this recipe and love it, stop back, give it a 5-star rating ★★★★★ and leave a comment.

Pão de Mel (Brazilian Honey Cakes)
Equipment
- mixer
- bowls
- fork
- muffin tin
Ingredients
For the Pão de Mel Cake Batter
- ¾ cup whole milk
- 1 teaspoon cinnamon
- ½ teaspoon ground cloves
- ¼ teaspoon freshly grated nutmeg
- ½ teaspoon ground ginger – optional
- ½ cup honey
- 2 large eggs
- 1 egg yolk
- ¾ cup light brown sugar
- ½ tablespoon pure vanilla extract
- ⅓ cup vegetable oil
- 3 tablespoons unsweetened cocoa powder – sifted
- ½ teaspoon baking powder – sifted
- ½ teaspoon baking soda – sifted
- 1 ½ cups all-purpose flour – sifted
For the Dulce de Leche Filling
- 1 can dulce de leche – 13.4 oz
For the Chocolate Coating
- 4 cups bittersweet chocolate chips
- ½ tablespoon vegetable oil – optional
Instructions
Prepare the Batter
- Prepare the oven and muffin tin: Preheat the oven to 350°F (180°C). Grease a mini or standard-size muffin tin and dust the cups with cocoa powder or flour. Set aside.
- Infuse the milk and spices: Combine the milk, cinnamon, cloves, nutmeg, optional ginger, and honey in a small saucepan over medium heat. Stir and bring to a quick boil. Remove from the heat, cover, and let sit for 10–20 minutes.
- Blend the wet ingredients: Let the milk mixture cool until warm, not hot. Pour it into a blender with the eggs, egg yolk, brown sugar, vanilla extract, and vegetable oil. Blend for 15–20 seconds, just until combined.
- Mix the batter: Combine the sifted cocoa powder, baking powder, baking soda, and flour in a large bowl. Pour in the blended mixture and whisk just until combined. Avoid overmixing.
Bake and Flatten the Cakes
- Fill and bake: Divide the batter evenly among the prepared muffin cups, filling them about halfway. Bake on the middle oven rack for 10–12 minutes for mini cakes or 18–20 minutes for standard-size cakes, until a toothpick inserted into the center comes out clean.
- Unmold the cakes: Run a knife around the edges to loosen them. Carefully invert the cakes onto a large, flat platter or clean baking sheet while they're still hot, with their rounded tops facing down.
- Flatten the tops: Place another baking sheet over the inverted cakes, then set something heavy, such as a cast-iron skillet, on top. This helps flatten the rounded tops and works best while the cakes are still hot.
- Rest and slice: Leave the cakes under the weight for 5–10 minutes. Remove the weight, then slice each cake in half horizontally.
Fill and Coat the Pão de Mel
- Add the dulce de leche: Spread or pipe dulce de leche onto one half of each cake. Place the other half on top to make a sandwich, similar to a whoopie pie.
- Melt the chocolate: Place the bittersweet chocolate chips in a large microwave-safe bowl. Microwave in 30-second intervals, stirring after each interval, until melted, about 1 ½–2 minutes in total. Stir until smooth.Note: If needed, stir in the optional vegetable oil to keep the melted chocolate from hardening too quickly.
- Coat the cakes: Place each Brazilian honey cake on a fork and dip it into the melted chocolate. Smooth the chocolate over the top and sides, then transfer to a wire rack set over a baking sheet or a parchment-lined baking sheet. Let the excess chocolate drip off. Refrigerate for 3–5 minutes, until the coating hardens.
- Trim and decorate: Use a paring knife to trim any excess hardened chocolate from the bottom edges. Serve as they are, or decorate with melted white chocolate and sprinkles.
Recipe Video

Recipe Notes
Storage and Freezing
Make Ahead: Prepare and freeze the unfilled cakes in advance. Add the dulce de leche and chocolate coating closer to serving for the best texture and appearance. Room Temperature: Keep assembled pão de mel refrigerated because of the dulce de leche filling. When serving, avoid leaving the cakes at room temperature for more than 2 hours, or 1 hour if the temperature exceeds 90°F (32°C). Refrigerate: Store the filled and chocolate-coated cakes in an airtight container at 40°F (4°C) or below for up to 3–4 days. Freezer: Freeze the baked cakes before slicing, filling, or coating. Let them cool completely, wrap them individually in parchment paper, and place them in a freezer-safe bag or airtight container. Freeze for up to 3 months for best quality. Thawing: Thaw the unfilled cakes in the refrigerator, then let them come to room temperature before slicing, filling with dulce de leche, and coating in chocolate.Nutrition
** Nutrition labels on easyanddelish.com are for educational purposes only. This info is provided as a courtesy and is only an estimate, since the nutrition content of recipes can vary based on ingredient brand or source, portion sizes, recipe changes/variations, and other factors. We suggest making your own calculations using your preferred calculator, based on which ingredients you use, or consulting with a registered dietitian to determine nutritional values more precisely.
Please note that health-focused and diet information provided on easyanddelish.com is for educational purposes and does not constitute medical advice, nor is it intended to diagnose, treat, cure, or prevent disease. Consult with your doctor or other qualified health professional prior to initiating any significant change in your diet or exercise regimen, or for any other issue necessitating medical advice.
Did you make this recipe?
Comment and rate the recipe. Also follow us on Pinterest at @easyanddelish for more delish recipes.The post was first published on March 21, 2013.

Very good recipe!
Hello! I hope to make these soon. Can you tell me what the gold little flakes are on top of the cakes are? Is that white chocolate drizzled on top? Thank you!
Hi Katie! The white drizzle is white candy melts but you can use white chocolate if you prefer. And the golden flakes are Wilton's golden sprinkles that you can find in chain supermarkets and party stores. I bought them at my local supermarket! Enjoy the paes de mel!
Your Brazilian sweet treats always continue to impress me, they look so decadent
Thank you! Yes, pao de mel is a decadent treat enjoyed all year round in Brazil and not only around Christmas. It is the Brazilian gingerbread though, made with spices, chocolate, and honey. So good!
Your spiced mini honey cakes looks scrumptious , and the presentation with that melting dulce de leche feels like I need a bite right away, so tempting! thanks for sharing your way of cake recipe!
This Brazilian gingerbread looks really yummy, love that filling!
Like a little bite of paradise!
Ye4s, pao de mel is delicious... it consists of a gingerbread cake loaf filled with dulce de leche and covered in chocolate. It is enjoyed all year round in Brazil in contrast with the American gingerbread which is enjoyed only around Christmas time.
Hi Denise. I had pao de mel in Brazil a couple of years ago. I have tried many recipes since I returned to the US and this was the best.
Oi Denise, eu queria muito fazer a receita mas estou em duvida com relacao ao acucar mascavo! Aqui no UK nos temos Muscovado, Light Brown e Dark Brown sugar, e tb o Demenara. Voce acha que o Light Brown eh o mais parecido com o Mascavo Brasileiro? Ja tentou usando os outros acucares? Obrigada!
Olá, Larissa! Bem-vinda!
Claro que sim. Você poderá usar o light brown sugar sem problema para essa receita. Esse é o açúcar da versão em inglês desta receita. É o único que uso para fazer pão de mel. Acho o dark brown sugar muito cheio de molasses, o qual dá um gosto quase desagradável a receita. O bom do light brown sugar é que podemos sentir o gosto das especiarias.
Espero que isso ajude! Um abraço!!!
Just finished making these (in mini-muffin tins), and they're great! Mine don't look half as beautiful and professional as yours of course, but I think they're still pretty. I'm bringing some to my Portuguese teacher right now to remind her of home. Thanks so much for the recipe. I'm excited to try out more from your site!
Hi, Cat!
I am so glad that you enjoyed these pães de mel. I am sure yours look great. Most important is taste.
It is like Andrew Zimmern always says, "if it tastes good, eat it." 🙂
I just ate the last little Pão de mel truffle my friend gave me when I was leaving Brazil last week, and I wanted to cry. Then I found your recipe---so excited! I'll let you know how they turn out!
Thanks, Cat! I hope you enjoy this recipe. Both my hubby and my youngest daughter are crazy for it. I intend to make this on Xmas week again. They will love the surprise!
Ola Denise, sou brasileira e moro nos USA.
Jah tentei varias vezes fazer a receita de pão de mel que eu fazia no Brasil, mas nunca obtive sucesso aqui nos USA.
Gostaria de saber se vc testou a sua receita usando os ingredientes americanos.
Obrigada
Debora
Olá, Debora!
Sim, todas as minhas receitas são testadas usando as medidas americanas. Pode fazer que você vai gostar. Todos aqui em casa adoram pão de mel. Esses daqui saem parecidos com mini cakes ao invès de parecerem com sandwich cookies. Um abraço!
Hi Denise...
I do want to try this recipe!!
Can I bake this in a 9in x 13in baking pan? So, after that I can cut small squares...and
How long should I bake?
Thank you
Hi, Rosie!
Although I have never baked this in a large baking pan, I do believe there will be no problem if you do so. I could not precise its baking time but I think it should take from 28 to 35 minutes for that pan size (or until a toothpick inserted in the center comes out clean). Do the toothpick test! It works every time. 🙂
Hi,
What kind of "simple syrup" did you use to avoid releasing crumbs in the melted chocolate?
Thank you!
Hi, Elisangela!
Welcome to FBTY!!! There is a recipe for simple syrup here: https://www.frombraziltoyou.org/chocolate-cake-bolo-nega-maluca-birthday/
You can use it to brush the pão de mel or any other cake. Wishing you a great day!
Caramba! Eu amei pao de mel quando morava no Brasil e sempre queria saber como faze-lo. Parece muito gostoso! Vou ter que tenta-lo mesmo.
Obrigada, Lisa! A minha família provou pão de mel pela primeira vez e amou. Essa receita é excelente -- até mesmo pra comer o bolinho, tipo muffin, sem recheio e cobertura. Espero que você possa fazer...
Beautiful photos! I want to make these just so I can flash everyone with the name 🙂 "Oh these? They're Pão de Mel" as if I knew what it was 🙂 I can follow directions though. LOL
Love it, Maureen! I so wish you'd make these cakes which are already a family-favorite. They are great as muffins as well. My youngest daughter prefers them without the dulce de leche and chocolate (muffin) while my eldest daughter, just the way that you see in the pictures (cupcake-style). I love both! 😉 Thanks for stopping by!!!
This seems so delicous Denise, I love the way you decorated your little babies as well. Thanks.
Thanks a lot, Amira! I am thankful for your visit as well. Have a great Sunday!
Wow! This is a beautiful post, pictures, recipe, everything! Your little cakes sound fantastic!
Thanks, Cris! I am happy to know that you've enjoyed everything in this post.
My family and I are huge fans of these spiced cakes. Wishing you a great evening!
Hello Denise, I am so glad you did a guest post for Nazeen as your recipes are just beautiful. I am so delighted to meet you as I do not know many bloggers with the expertise in the area of Brazilian culinary and I can't wait to read more of your recipes. Your honey bread cake is so beautiful and love your photography. Take Care, BAM
Thank you for visiting me, Bam! I do appreciate it...
Thanks for your kind words as well. I do hope you visit us again. Have a great weekend!
So pretty Denise! Caramel, Spices and Chocolate...is there anything you have left out. Love the flavours! Sounds and looks awesome.
Thank you, Sonali! Yes, this cake has it all. 🙂
Ah, que bolinhos lindíssimos!!! Fiquei admirada, querida!!! Adorei a receita, a decoração dos bolos, as fotos e a apresentação! Adorei tudo! :)) Obrigada pela receita perfeita, Denise! 😉
Beijinho e bom fim de semana! 😉
Muito obrigada por suas palavras tão gentis, Miúda! Estou feliz em saber que você gostou de tudo. Espero que um dia você tenha a chance de provar desses pães de mel, os quais são um sucesso na minha casa. O meu marido e filhas adoram!!!
Wonderful recipe Denise, and I love how you decorate your breads...so lovely...
Thanks, Nydia, for taking time to visit me and leave a comment. I do appreciate it.
I am glad that you like them. I love these cakes as well as my family. They disappeared pretty fast. Wishing you a great Friday and weekend! xx
Oh, what cute and decadent cakes! Decorated so beautifully...and the caramelly filling sounds divine!!
Thanks, Liz! They were a hit at my home...
Interestingly, here in Mumbai, the local namee of bread is (guess what!!) PAO! This recipe sounds so good, something irresistible with all those spices going in!
Thanks, Purabi!