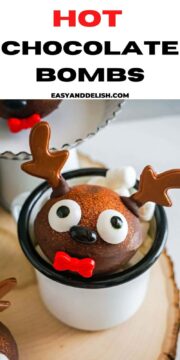
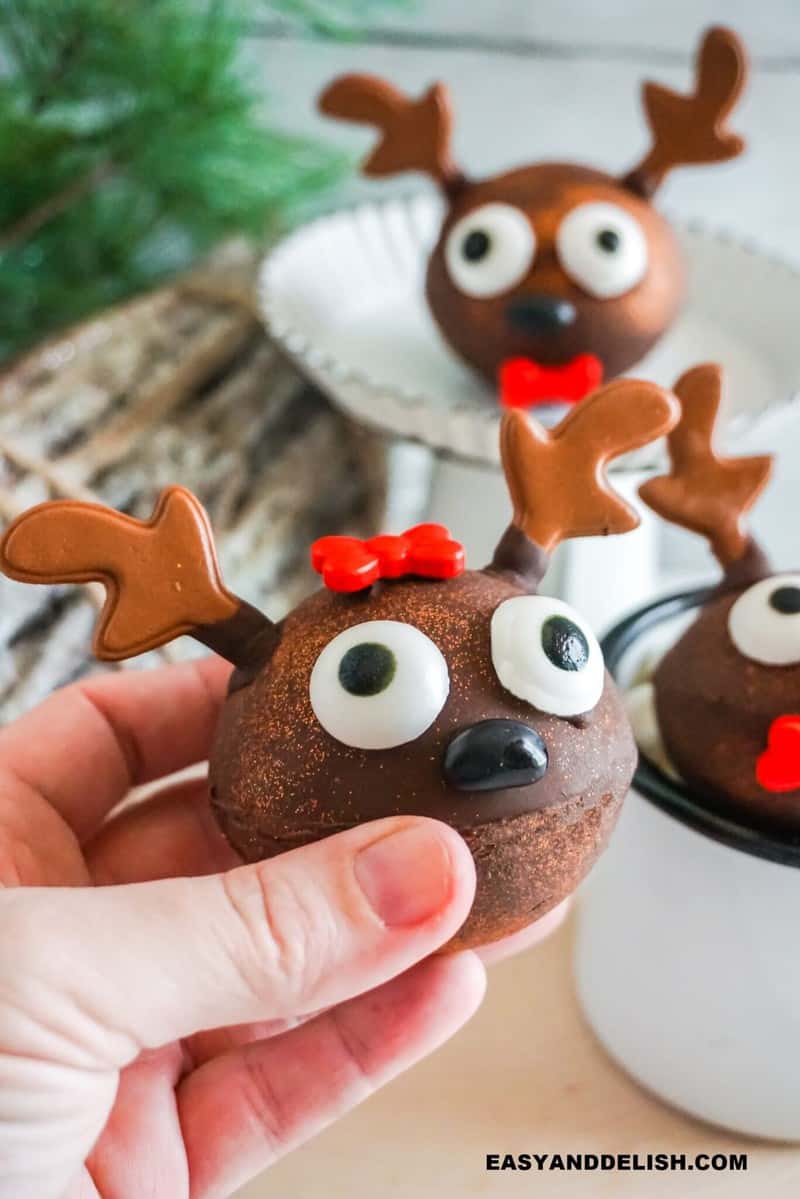
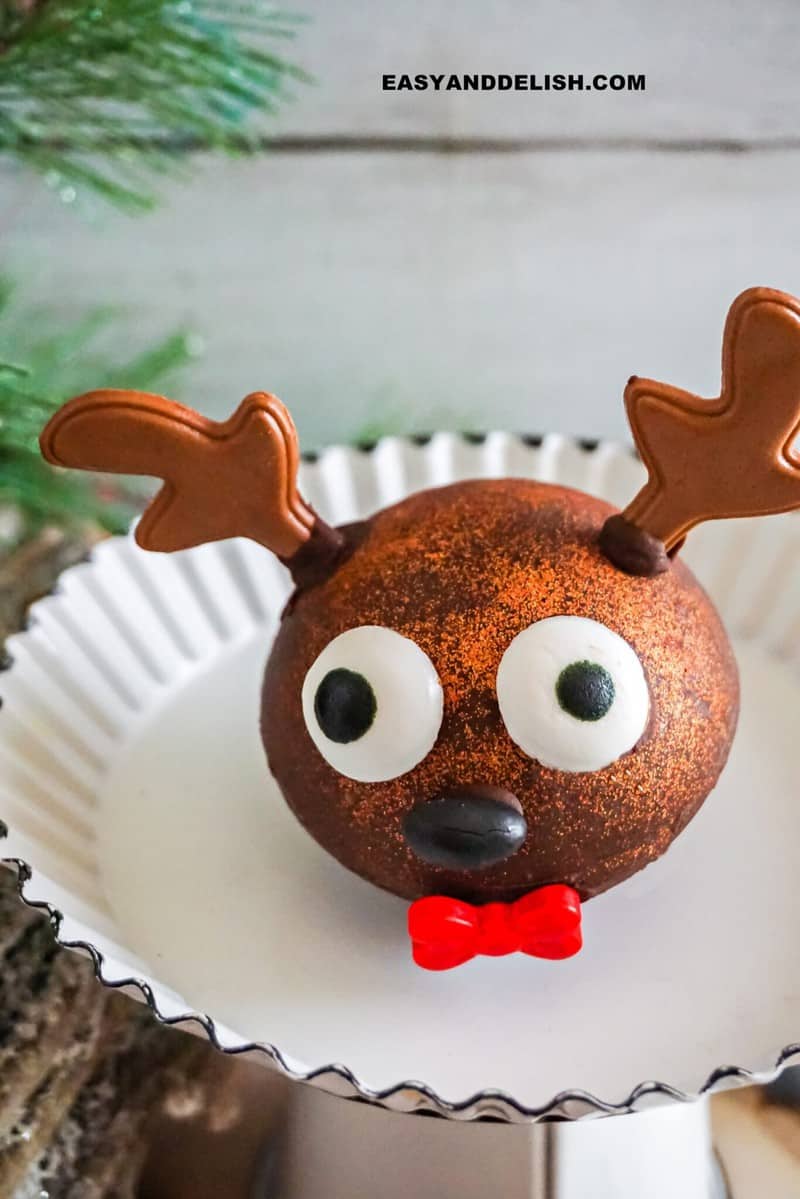
Hot Chocolate Bombs are spheres made with either melted chocolate or candy melts filled with hot cocoa powder and mini marshmallows. They are put into a mug with hot milk for a cozy and delish cup of hot cocoa. Ours are decorated as Reindeer, making a fun edible present for Christmas! Watch the video!
Christmas is just around the corner! Can you believe it?
Whether you want to make fun memories with your kids or grandchildren, or to give a nice yet budget-friendly present to friends and co-workers, these Reindeer Hot Chocolate Bombs fit the bill!
Just wrap them in a plastic bag with a beautiful tie and a tag with instructions for use, place them in a cute mug, and give them as gifts for the Holidays! These 15 Inexpensive Christmas Food Gifts follow the same idea!
They are super easy to make, require only 5 ingredients, and can be customized according to your wishes.
Come with me and find out the best way to make them!
How to Make Hot Chocolate Bombs
This is a simple process that requires about 45 minutes of your time, depending on how fast or slow you work.
- Coat the mold with glitter: Liberally coat the inside of each mold cavity with the edible glitter. The glitter will stick to the silicone. You don’t need to prep the mold in any special way.
- Melt the candy melts: Place candy melts in a microwave-safe bowl and melt in the microwave, following the directions on the package.
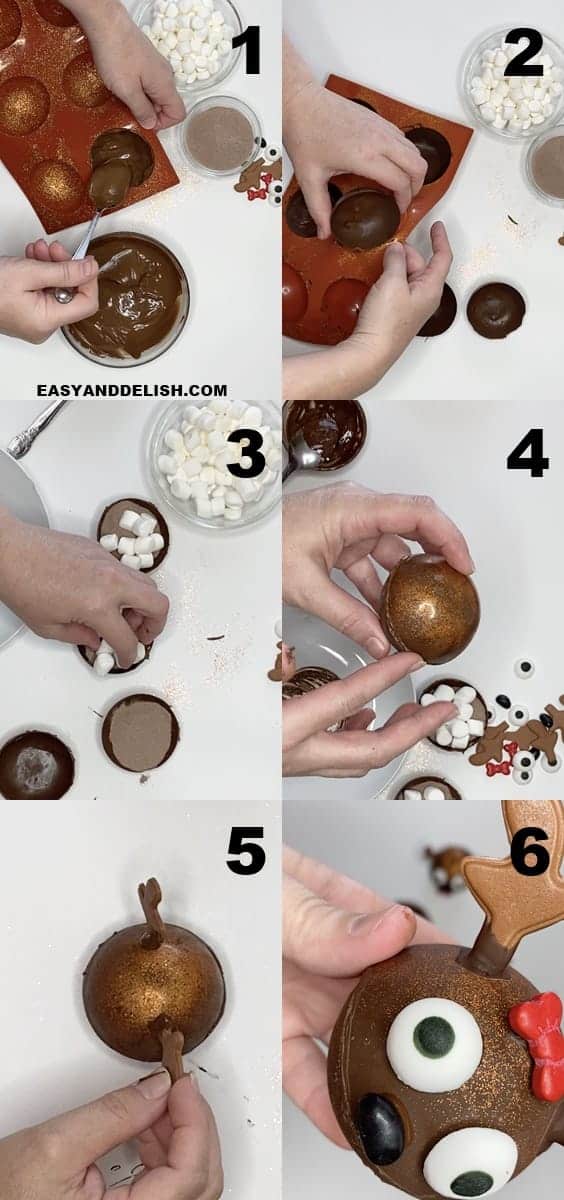
- Fill the mold: Place 1 tablespoon of the melted candy melts into one cavity of the bomb mold and, using the back of a spoon, press the chocolate up the sides of the mold, keeping it thick but even. Repeat the process with 12 half spheres. Do not throw out your remaining melted chocolate (reserve it for a subsequent step). SEE PIC. 1
- Freeze: Place the chocolate-filled bomb molds into the freezer for 5 minutes. Remove molds from the freezer and gently pull the silicone mold away from the chocolate half-spheres. SEE PIC. 2
- Fix the edges: If the edges of your chocolate half-spheres are not even, heat a plate in the microwave until it is warm to the touch. Then turn each of the half-spheres open-side down onto the hot plate’s surface and gently melt the edge, making it even.
- Fill the cocoa bombs: Fill 6 of the chocolate half-spheres with 1 tablespoon hot chocolate mix and 5-6 mini-marshmallows. SEE PIC. 3
- Close the chocolate bombs: Turn one of the half-spheres open-side down onto the plate’s surface and gently melt the edge. Immediately press the hollow chocolate ball onto the top of one of the filled half-spheres. This will close the hot chocolate bomb, making a full sphere. Alternatively, you can pipe a little of the melted candy melts along the edge of each filled half-sphere, then place an empty half-sphere on top. Repeat with all of the hot chocolate bombs. SEE PIC. 4
- Freeze again: Place the chocolate spheres into the freezer for 5 minutes to get them to set, then remove.
- Decorate: If you don’t have premade antlers, place ½ of your reserved melted chocolate into a piping bag with a small piping tip (or a zipper top bag with a very small corner cut out) and pipe 1 ½-inch tall antler shapes onto a baking sheet lined with parchment paper. Place these in the freezer to set for 5 minutes. Remove from the freezer and peel off the parchment paper using a metal spatula.
- With your reserved melted chocolate, dip the base of a reindeer antler into the chocolate, attaching a liberal bit of chocolate to the end of the antler. Immediately press this to one side of a hot cocoa bomb top. Hold for a moment until the chocolate hardens enough to hold the antler steady. Repeat placing a second antler on the same cocoa bomb, then repeat until all of the hot cocoa bombs have two antlers. Again, do not discard your melted chocolate. SEE PIC. 5
- Place them into the freezer for 5 minutes to get the antlers to set, then remove.
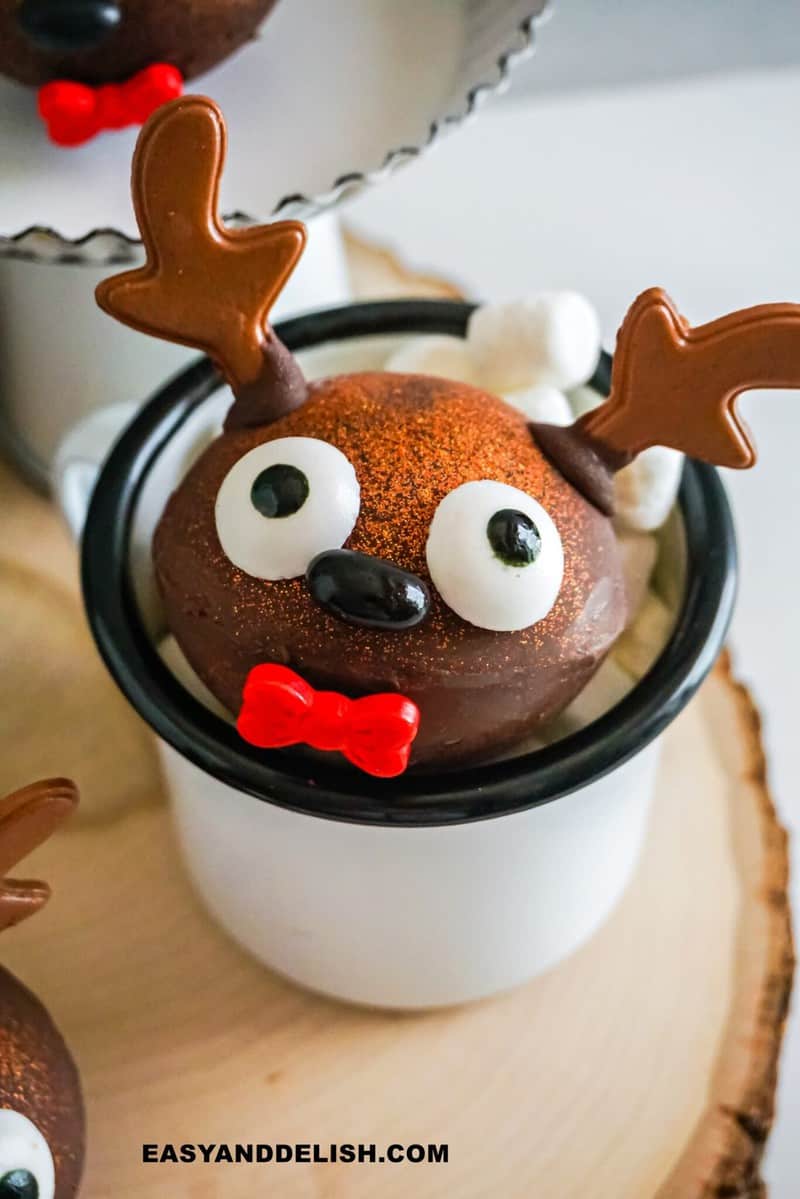
- Using the melted chocolate you reserved, add a dab to the back of a bow and place it on the head between the antlers or below the midline of the hot chocolate bomb for a bow tie. Repeat for all of them.
- Add a dab of melted chocolate on the back of each candy eyeball and place it on the hot cocoa bomb, just above the midline of the bomb and to one side, below an antler. Repeat with a second eyeball so that the reindeer hot chocolate bomb has two eyes. Repeat for all of the hot chocolate balls.
- Add a dab of melted chocolate on the back of a black or red jelly bean (using a pastry brush if needed) and place it on the hot cocoa bomb, between the eyes and at the midline of the hot cocoa bomb. Repeat for all of the hot cocoa bombs. SEE PIC. 6
- Freeze to set: Place the hot cocoa bombs into the freezer for 5 minutes to get the decorations to set, then remove and store in an airtight container until you’re ready to use.
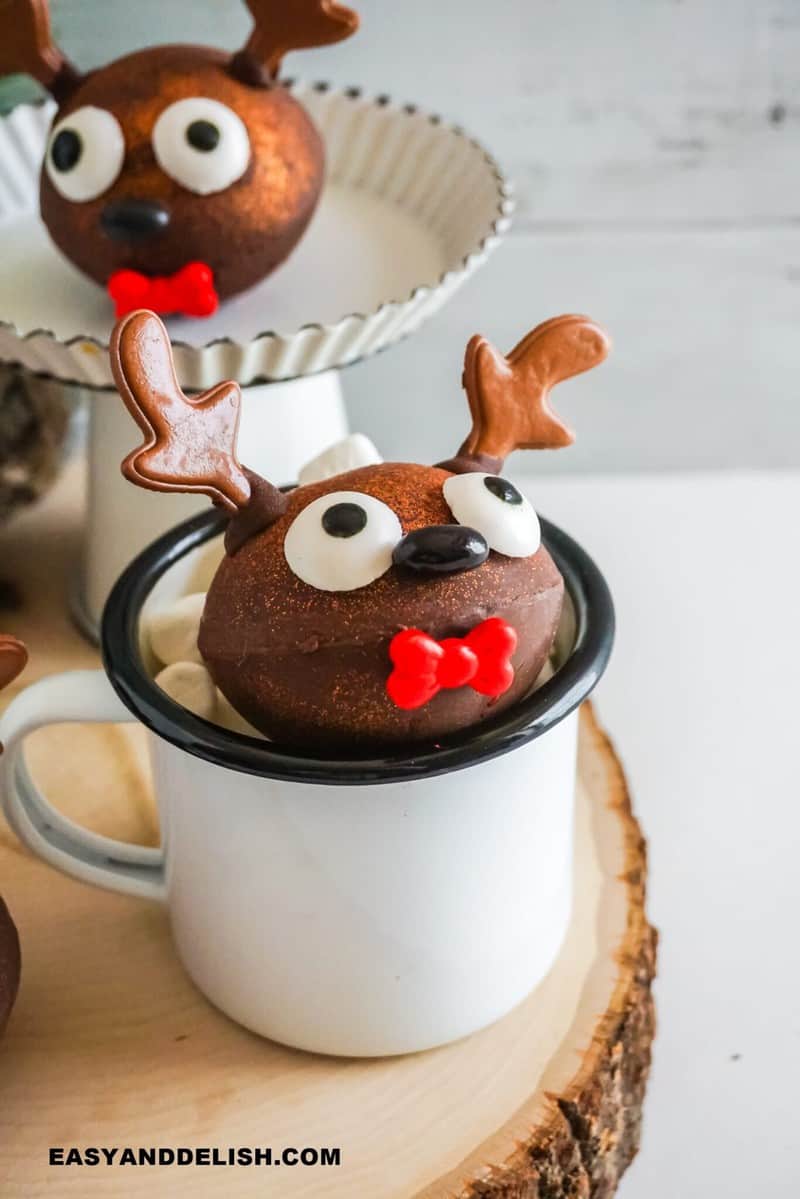
- Serve and enjoy: To use the hot cocoa bombs, place them in a mug and pour hot milk over the top. Stir until the hot cocoa bombs are fully melted and enjoy!
If you don’t want to make your own, you can buy ready-to-use hot chocolate bombs at Costco or Walmart. Then customize your decoration, making this process simpler and f
What are hot chocolate bombs?
They consist of hollow chocolate balls or spheres filled with dry hot cocoa powder and marshmallows. You can decorate them in many ways to look beautiful and to fit the occasion, such as Christmas, Valentine’s Day, Birthdays, etc.
Once they are ready, all you need to do is place a hot cocoa bomb into a mug and pour hot milk on top. And BOOM… the magic happens!
The chocolate bomb melts, making a rich cup of hot cocoa. Plus, it is super fun to watch!
They look like bath bombs but they are very much edible.
Ingredients and Substitutions
Firstly, to make our hot chocolate bombs you will need about 5 ingredients:
- Chocolate Candy Melts – They are easier and faster to work with, requiring no tempering. But if you use chocolate, I recommend tempering it first in order to produce hot chocolate bombs that are shiny and won’t melt easily at room temperature. Find out how to temper chocolate below!
- Hot chocolate mix – Use your favorite one to fill the bombs.
- Mini marshmallows – Depending on the occasion, you may use the white marshmallows or the colorful type.
- Gold Edible Glitter – This is optional but it’ll make your cocoa bombs look magical-- just like Christmas!
- Wilton Reindeer Edible Decorations -- You can customize yours as you wish. I love Rudolph, the Red-Nosed Reindeer, so I bought the kit to decorate mine. But you can use alternative ingredients such as:
- Black (or red) Jelly Beans for the nose
- Red Bow Sprinkles to decorate the head
- Candy Eyeballs for the eyes
- Chocolate to melt and then pipe over parchment paper to make the antlers. Make sure to let them dry until stiff. Use a metal spatula to gently separate them from the paper.
Equipment Needed to Make Christmas Hot Chocolate Bombs
- Silicone sphere mold (easier to work with than acrylic molds)
- Mixing bowls
- Spoons
- Freezer
Tempering Chocolate
Don’t worry! This is an easy process needed to control the heat of your chocolate while melting and cooling it down, making it shiny and stable at room temperature.
After all, you don’t want your chocolate bombs to melt at room temp, do you?
To avoid the need for tempering chocolate, use candy melts!
Here is how!
How to easily temper chocolate in the microwave:
Place semi-sweet chocolate into a microwave-safe bowl and microwave for 30 seconds on high, then stir.
Microwave one more time for 30 seconds, then 15 seconds, and then 10 seconds. Make sure to stir in between each heating. Do NOT rush this process!
Always check your thermometer to make sure the temperature is not going above 90ºF for this type of chocolate specifically.
When your chocolate is melted and smooth, it’s ready to use! Easy peasy!
TIP: Keep an eye in the temperature of the chocolate:
- Dark chocolate or Semi-sweet chocolate should never go above 88°F-90°F.
- Milk chocolate must not go above 84°F-86°F.
- White or colored chocolate must not go above 82°F-84°F. The chocolate must contain cocoa butter for this to work as well!
Thus LINDT white chocolate bars, some white couverture chocolate, or almond bark work well but use a silicone mold only for white chocolate. But if making a large batch of colored cocoa bombs, use an acrylic mold that is much easier to hand paint.
Hot Chocolate Bomb Mold
You can use either silicone mold (it’s cheaper, soft, and bendable) or an acrylic mold (hard and stiff).
Some people prefer to use the latter one to obtain the ultimate shine but I don’t see a great difference! I also think the silicone mold is much easier to remove the hot chocolate bombs from.
But if you are coloring/hand painting your hot chocolate bombs, use the acrylic mold.
aster!
How to Use Hot Cocoa Bombs
Depending on how rich and also how large or small your chocolate bombs are, use about 8-14 oz milk (1 to 1 ¾ cups) to serve with.
Just heat the milk until it’s steaming (not boiling). Place the hot chocolate bomb in the bottom of the mug and then pour the milk on top.
The hot liquid will open up the cocoa bomb and all the marshmallows will float. It is magical!
Lastly, use a spoon to stir and combine the cocoa bomb into the hot milk to make the perfect cup of hot chocolate!
Variations of this Hot Chocolate Bomb Recipe
Fill hot chocolate bombs with a variety of things: instant coffee powder, a mixture of espresso and hot cocoa mix, your favorite chopped candy, mini chocolate chips, caramel morsels, peanut butter chips, chopped candy cane, etc
To spike your hot cocoa, you may add 1 tablespoon of chocolate liqueur or Baileys Irish Cream with warm milk and drop your chocolate bomb into it.
Tips for Making Cocoa Bombs
- Use candy melts or look for a chocolate labeled couverture (higher cocoa butter amount, resulting in shinier chocolate bombs)
- Use different types of chocolate to make white chocolate bombs, milk chocolate bombs, or bittersweet cocoa bombs.
- Prefer a silicone mold for easy removal, or use an acrylic mold if hand painting the chocolate.
- Temper the chocolate!
- Make bombs thick enough that they won’t easily crack when removed from the mold.
- Fill them with your favorite things.
- Decorate them according to the occasion or holiday!
How to color chocolate
If you want to color your white chocolate, just add a little melted colored cocoa butter (about 1 teaspoon for 2 Tablespoons of melted white chocolate and mix).
Make sure your cocoa butter is at the right temperature before using it (88ºF).
How to Store Chocolate Bombs
Store hot chocolate bombs in an airtight container in the fridge or in a cool and dry place. Make sure to not expose them to sunlight.
When going from the fridge to the counter, they may become foggy or sweaty but they are perfectly fine. As long as your fillings and toppings aren’t moist, they will last for a long time.
Some wrap them well and freeze them. But be aware this will affect the chocolate's structure, making it fragile and susceptible to cracking when thawed.
Other Christmas chocolate treats to enjoy:
- Brigadeiros Recipe
- Chocolate Chess Pie
- No-Bake Chocolate Pie with Meringue
- Easy Chocolate Mousse
- Brazilian Chocolate Bread Pudding
PIN & ENJOY!

Hot Chocolate Bombs
Equipment
- Silicone sphere mold
- Mixing bowls
- Spoons
- freezer
Ingredients
- 2 cups chocolate candy melts If using chocolate, SEE how to temper it first in the NOTES below.
- 6 tablespoon hot chocolate mix
- 36 mini marshmallows
- Gold Edible Glitter
- 6 Reindeer Edible Decorations I used a Wilton kit but alternative instructions are available below (SEE NOTES)
Instructions
- Coat the mold with glitter: Liberally coat the inside of each mold cavity with the edible glitter. The glitter will stick to the silicone. You don’t need to prep the mold in any special way.
- Melt the candy melts: Place candy melts in a microwave-safe bowl and melt in the microwave, following the directions on the package.
- Fill the mold: Place 1 tablespoon of the melted candy melts into one cavity of the bomb mold and, using the bottom of your tablespoon measuring spoon, press the chocolate up the sides of the mold, keeping it thick but even. Repeat the process with 12 bomb mold halves. Do not throw out your remaining melted chocolate (reserve it for a subsequent step).
- Freeze: Place the chocolate-filled bomb molds into the freezer for 5 minutes. Remove molds from the freezer and gently pull the silicone mold away from the chocolate half-spheres.
- Fix the edges: If the edges of your chocolate half-spheres are not even, heat a plate in the microwave until it is warm to the touch. Then turn each of the half-spheres open-side down onto the plate’s surface and gently melt the edge, making it even.
- Fill the cocoa bombs: Fill 6 of the chocolate half-spheres with 1 tablespoon hot chocolate mix and 5-6 mini-marshmallows.
- Close the chocolate bombs: Turn one of the half-spheres open-side down onto the plate’s surface and gently melt the edge. Immediately press this empty half-sphere to the top of one of the filled cups.
- This will close the hot chocolate bomb. Alternatively, you can pipe a little of the melted candy melts along the edge of each filled half-sphere then place an empty half-sphere on top. Repeat with all of the hot chocolate bombs.
- Freeze again: Place them into the freezer for 5 minutes to get them to set, then remove.
- Decorate: If you don’t have premade antlers, place ½ of your reserved melted chocolate into a piping bag with a small piping tip (or a zipper top bag with a very small corner cut out) and pipe 1 ½-inch tall antler shapes onto a baking sheet lined with parchment paper. Place these in the freezer to set for 5 minutes. Remove from the freezer and peel off the parchment paper using a metal spatula.
- With your reserved melted chocolate, dip the base of a reindeer antler into the chocolate, attaching a liberal bit of chocolate to the end of the antler. Immediately press this to one side of a hot cocoa bomb top.
- Hold for a moment until the chocolate hardens enough to hold the antler steady. Repeat placing a second antler on the same cocoa bomb, then repeat until all of the hot cocoa bombs have two antlers. Again, do not discard your melted chocolate.
- Place them into the freezer for 5 minutes to get the antlers to set, then remove.
- Using the melted chocolate you reserved, add a dab to the back of a bow and place it on the head between the antlers or below the midline of the hot chocolate bomb for a bow tie. Repeat for all of them.
- Add a dab of melted chocolate on the back of each candy eyeball and place it on the hot cocoa bomb, just above the midline of the bomb and to one side, below an antler. Repeat with a second eyeball so that the reindeer hot chocolate bomb has two eyes. Repeat for all of the cocoa bombs.
- Add a dab of melted chocolate on the back of a black or red jelly bean and place it on the hot cocoa bomb, between the eyes and at the midline of the hot cocoa bomb. Repeat for all of the hot cocoa bombs.
- Freeze to set: Place the hot cocoa bombs into the freezer for 5 minutes to get the decorations to set, then remove and store in an airtight container until you’re ready to use.
- Serve and enjoy: To use the hot cocoa bombs, place them in a mug and pour hot milk over the top. Stir until the hot cocoa bombs are fully melted and enjoy!
Recipe Video

Recipe Notes
- Black (or red) Jelly Beans for the nose
- Red Bow Sprinkles to decorate the head
- Candy Eyeballs for the eyes
- Chocolate to melt and then pipe over parchment paper to make the antlers. Make sure to let them dry until stiff. Use a metal spatula to gently separate them from the paper.
- Dark chocolate or Semi-sweet chocolate should never go above 88°F-90°F.
- Milk chocolate must not go above 84°F-86°F.
- White or colored chocolate must not go above 82°F-84°F. The chocolate must contain cocoa butter for this to work as well! LINDT white chocolate bars, some white couverture chocolate, or almond bark work well but use silicone mold only for white chocolate. But if making a large batch of colored cocoa bombs, use an acrylic mold that is much easier to hand paint.
Nutrition
** Nutrition labels on easyanddelish.com are for educational purposes only. This info is provided as a courtesy and is only an estimate, since the nutrition content of recipes can vary based on ingredient brand or source, portion sizes, recipe changes/variations, and other factors. We suggest making your own calculations using your preferred calculator, based on which ingredients you use, or consulting with a registered dietitian to determine nutritional values more precisely.
Please note that health-focused and diet information provided on easyanddelish.com is for educational purposes and does not constitute medical advice, nor is it intended to diagnose, treat, cure, or prevent disease. Consult with your doctor or other qualified health professional prior to initiating any significant change in your diet or exercise regimen, or for any other issue necessitating medical advice.
