
Popovers (a.k.a. the American version of Yorkshire Pudding) are tall, airy, and golden brown rolls that make one of the best sides for meats and soups or simply to eat with butter and/or jam for breakfast. Prepare them with 5 simple ingredients in the blender and flavor them with rosemary if desired.
These are some of my favorite quick rolls – just like this Brazilian cheese bread.
No yeast, no-knead needed… and also no resting time required for fermenting and rising!
Instead, blend the ingredients in the blender, pour into a greased tin, and bake until they pop over the rim.
Don’t you just love this type of recipe?
As soon as they come out of the hot oven, you can enjoy them while warm with a smear of butter. Man… oh man, how delish they are!
Make them any time of the week…or for the holidays! Tell ya what… they are as delish as a dinner roll (without all the hassle).
That’s not all! You can easily make them gluten-free by replacing one of the ingredients.
Table of Contents
- 1 What is a Popover?
- 2 Yorkshire pudding vs. popovers
- 3 Secret to Popovers
- 4 How to make popovers
- 5 Popover Recipe Tips
- 6 Do You Need A Popover Pan To Make Popovers?
- 7 Can you make popovers in a muffin pan?
- 8 Gluten-Free Popovers
- 9 Easy Popover Recipe Variations
- 10 How to Store and Reheat
- 11 Can you make popover batter ahead of time?
- 12 What to serve with this Popovers Recipe:
- 13 Other bread recipes to enjoy:
- 14 Popovers
What is a Popover?
It’s a light, airy roll made from egg batter derived from the 17th century English Yorkshire pudding. It’s typically baked in a tin with deep wells and straight sides rather than angled sides like a muffin tin.
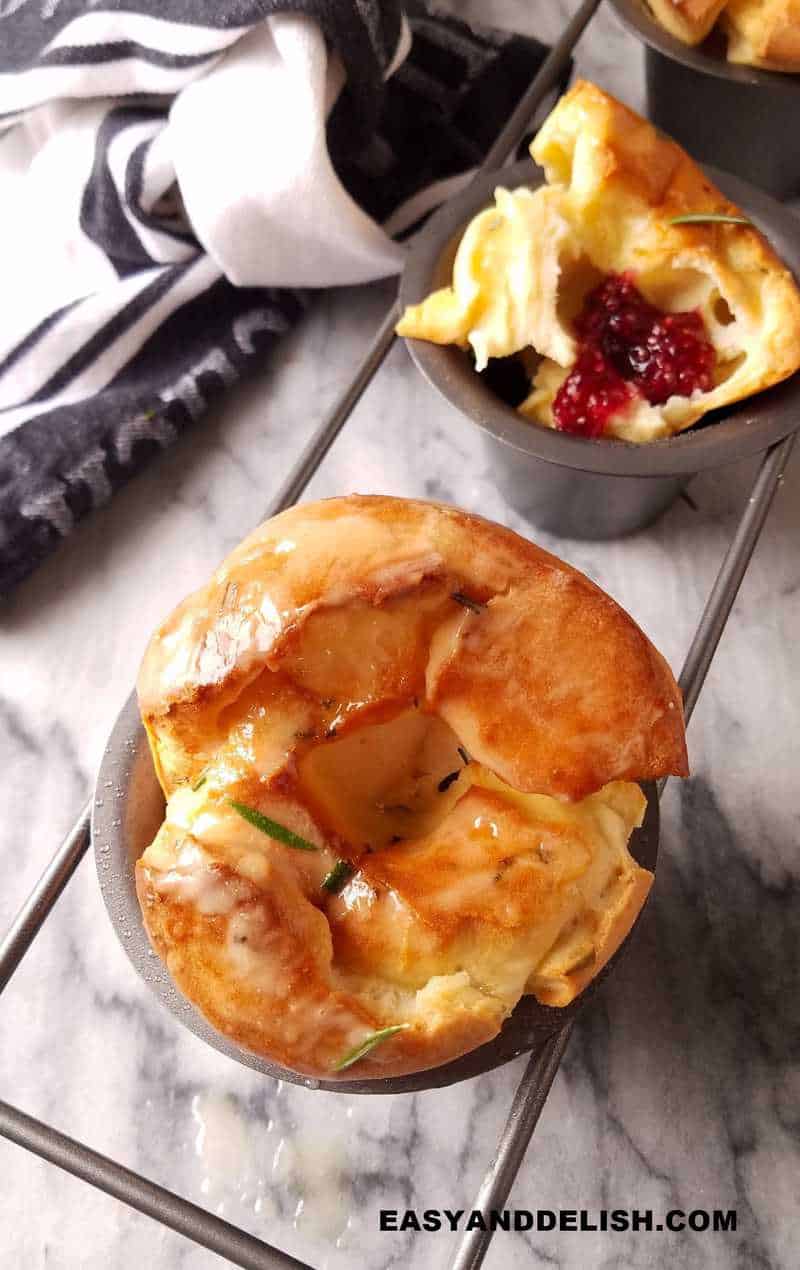
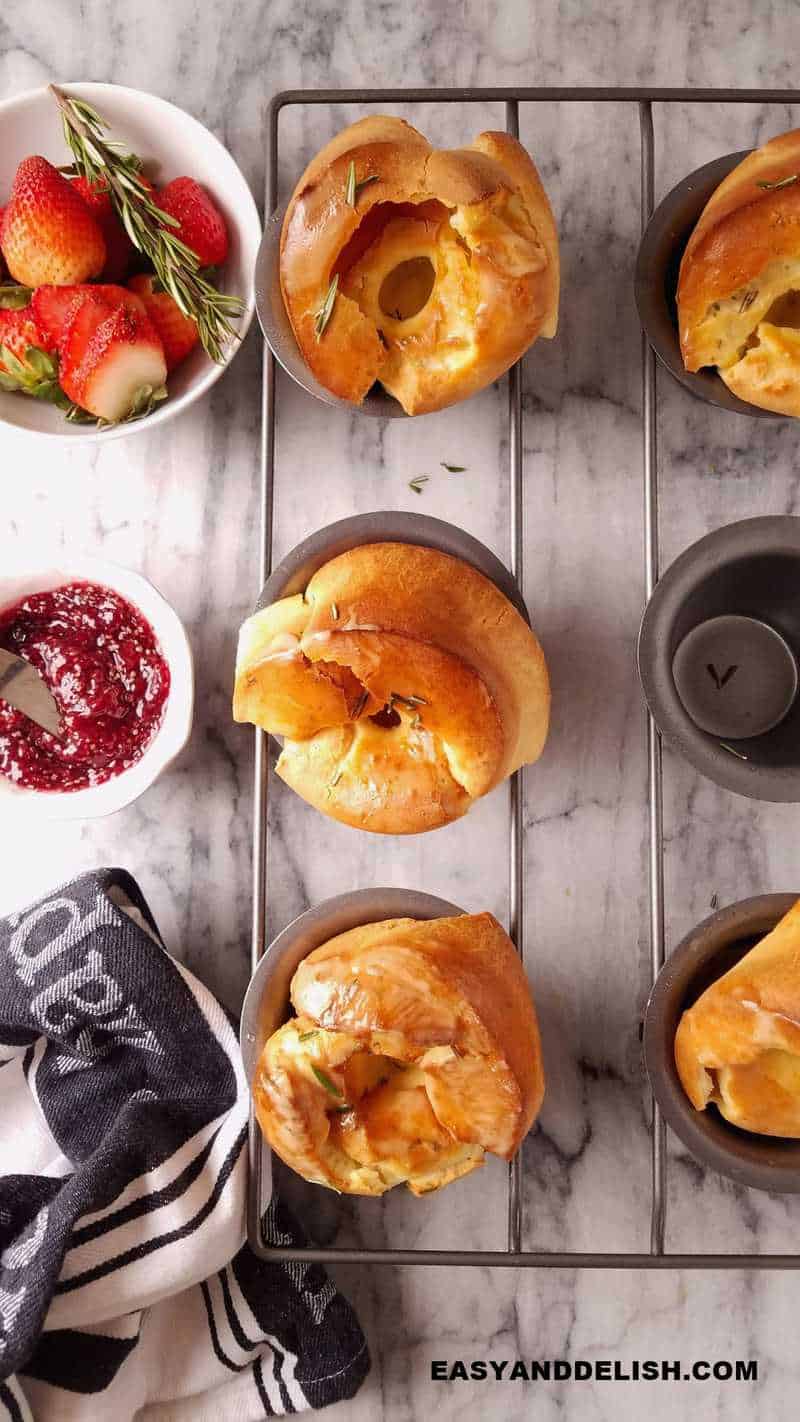
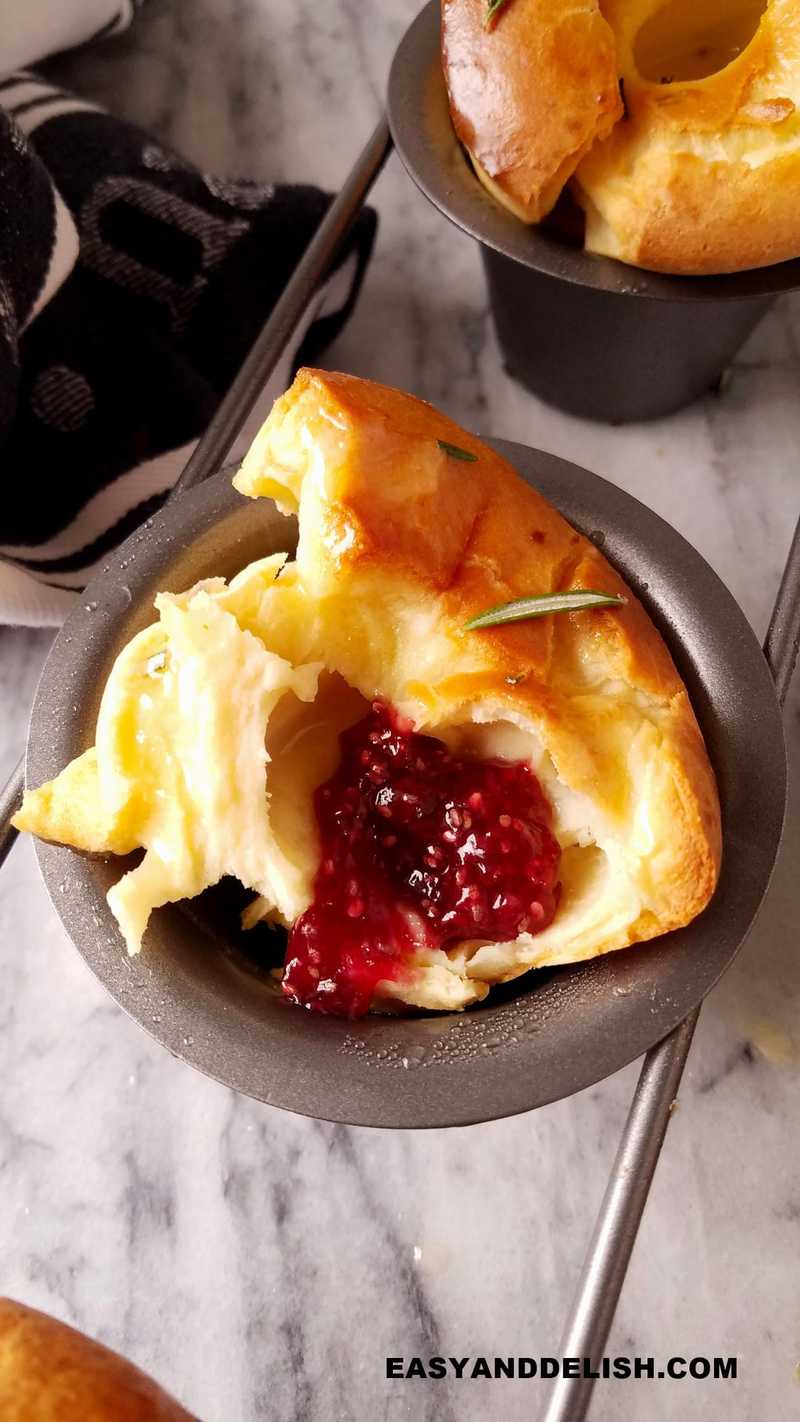
There are several ways to serve popovers. As a sweet, serve them topped with fruit and whipped cream, or with butter and jam for breakfast. As a savory side, serve them with meats or soups.
The name "popover" comes from the fact that the batter swells or "pops" over the top of the tin while baking. They are also known as Laplanders!
Yorkshire pudding vs. popovers
They share the same batter ingredients. The only difference is that popovers are baked in a popover pan greased with butter, whereas Yorkshire pudding is baked in beef drippings.
Secret to Popovers
I would say there is more than one secret to tall and airy popovers:
- Use a popover pan. If you replace it with a muffin tin, the popovers won’t be as tall as when they are baked in a popover pan.
- You can either add lukewarm milk to the batter (125° F) and/or preheat a greased popover pan in the oven for 2 minutes before pouring the batter into the cups and then baking. The heat will make them cook right away.
How to make popovers
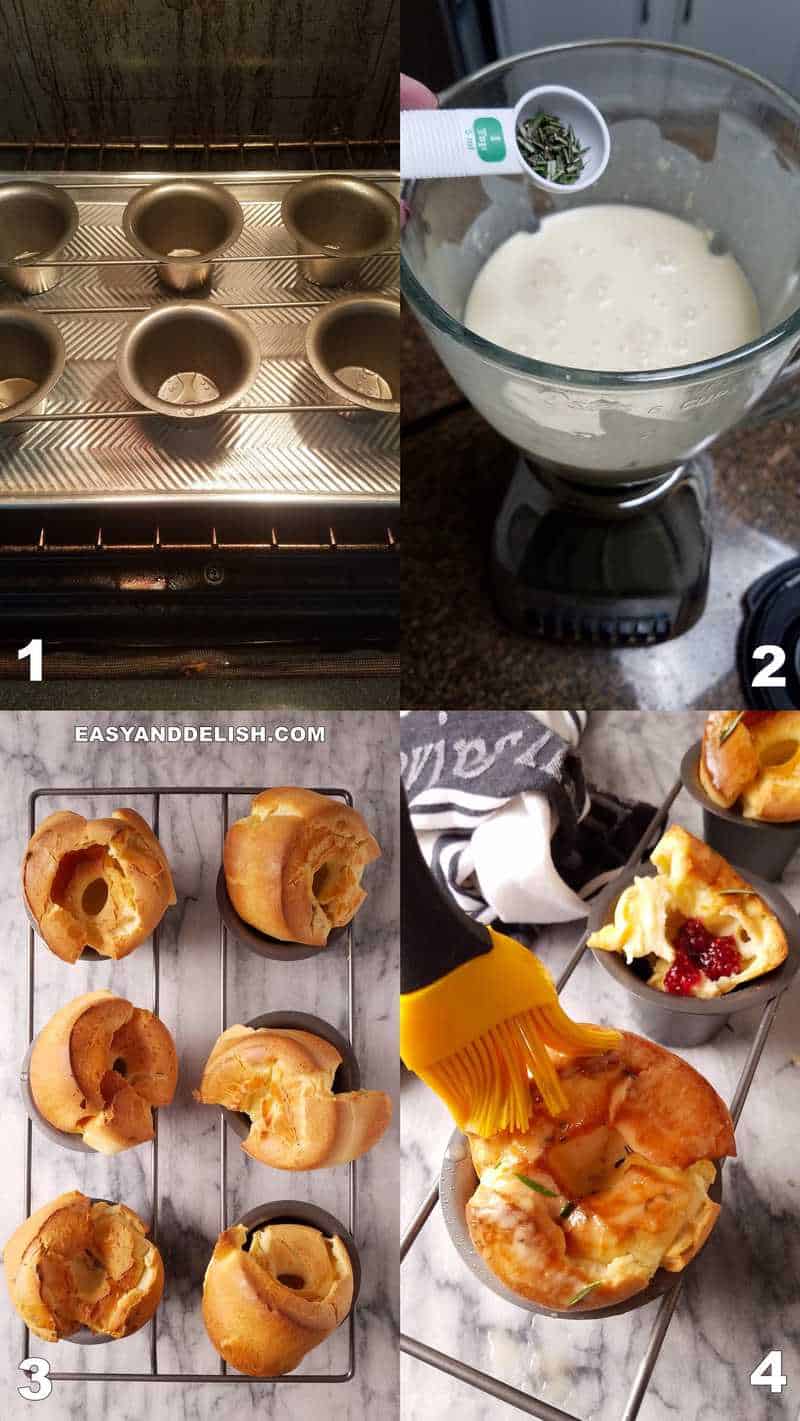
- Place the oven rack in the bottom third position and remove the one above it so the popovers will have room to rise. Preheat the oven to 450°F (230° C). Then spray a 6-cup popover pan with no-stick cooking spray (or brush with olive oil) and place it on a baking sheet. Heat the greased pan in the oven for at least 2 minutes! SEE PIC. 1 To make Yorkshire puddings, use beef drippings to grease the pan instead.
- Meanwhile, blend eggs, milk, and salt in a blender until homogeneous (about 15 seconds).
- Add flour, blending until smooth (if making gluten-free popovers, add also xanthan gum). Then, pour in the melted butter and blend until frothy. Using a wooden spoon, mix in the herbs (do NOT blend). SEE PIC. 2 NOTE: If you prefer, you can prepare the batter in a medium bowl using a whisk. If you have time, let the batter rest at room temp for 15 minutes before baking; otherwise, bake it right away!
- Pour the batter evenly into the cups of the prepared pan, almost to the top.
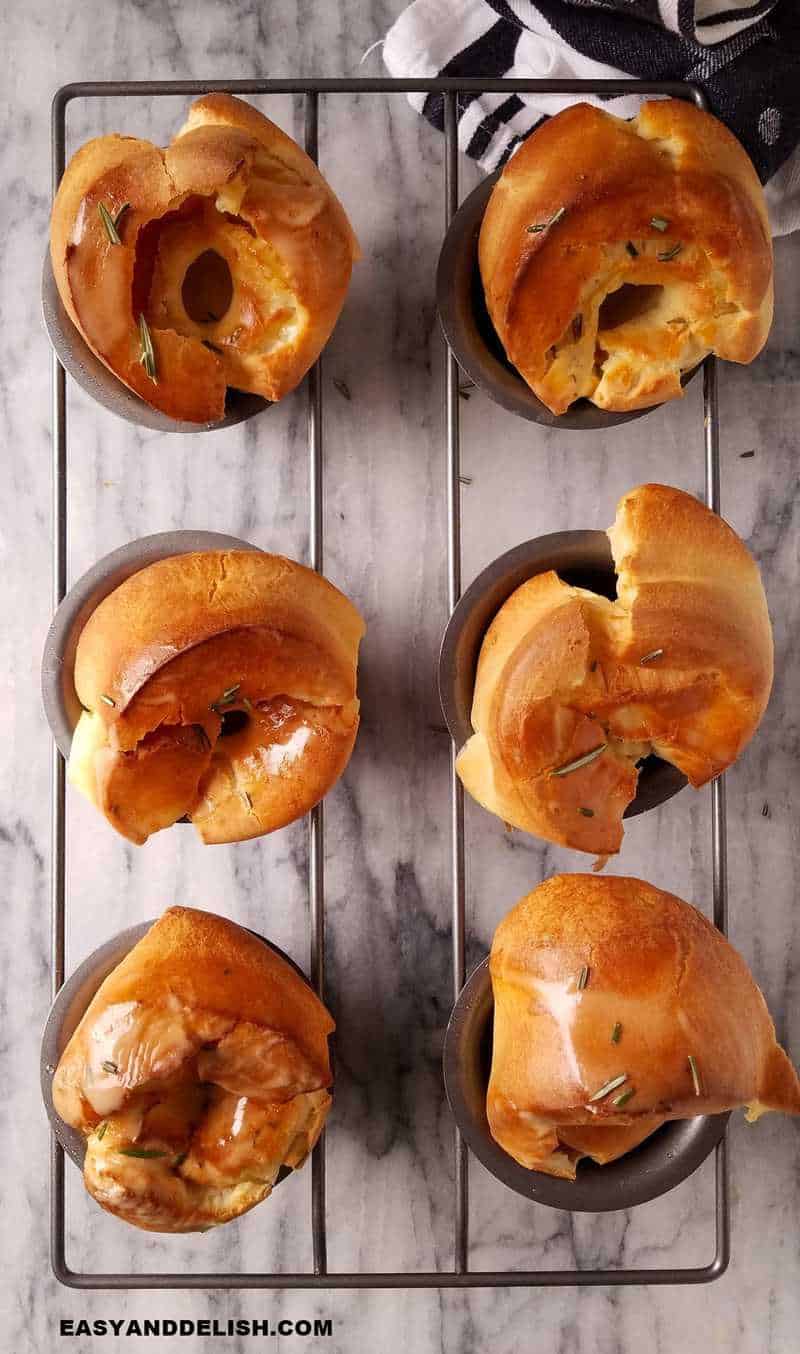
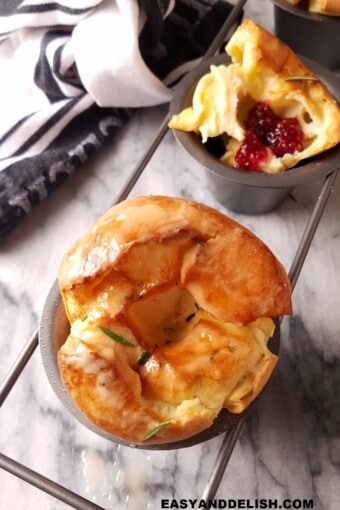
- Bake popovers for 20 minutes without opening the oven door. Reduce the heat to 350°F (again without opening the door), and bake for an additional 18-20 minutes, or until they're tall, deep, golden brown on top, and have "popped" over the tops of the pan.
- Remove them from the oven and gently pierce the top of each with the tip of a paring knife to release steam and help prevent sogginess. SEE PIC. 3
- Slip them out of the pan, split open, and serve with butter and/or jam! SEE PIC. 4 They make a great side for soups too!
NOTE: If using a regular muffin tin, this popover recipe makes 12 popovers instead of the 6 in a popover pan. But they won't be as tall and airy!
Popover Recipe Tips
- Make sure to level the flour. This ensures you have the proper amount (neither more nor less).
- The eggs must be at room temperature!
- The whole milk should be lukewarm before mixing into the batter. But if you forget, don’t fret! But make sure to preheat the greased popover pan in the oven before adding the batter to the pan! The heat (milk and/or pan) traps air which will expand, producing fluffy popovers.
- If you have time, allow the batter to rest at room temperature while the oven preheats. This makes popovers with an airier texture! In addition, it allows the starch molecules to expand and the gluten to relax. But if you are in a rush, go ahead and bake the popovers right away. If making gluten-free popovers, skip this because there is no gluten to relax!
- Spray the tin very well (well and tops) with nonstick spray, preventing them from sticking in the pan.
- Position an oven rack on a shelf in the lower third and remove the rack above it, leaving room for the popover to rise dramatically without getting their tops burned.
- Don’t open the oven door while they’re baking. This could cause them to deflate! Turn on the oven light and take a peek during the last 5-10 minutes. If they are browning too much, open the door quickly to place a cookie sheet on a top oven rack in order to shield the tops of the popovers from the heat.
- Pierce their tops with a pairing knife to let the steam escape once they’re done baking. This will prevent sogginess!
- You can add grated cheese (e.g. Parmesan or gruyere) to the batter to make cheese popovers. But do not blend it! Mix it in with a wooden spoon. The same goes for fresh or dried herbs such as thyme, rosemary, Italian seasoning, etc.
- If replacing fresh herbs with dried herbs, use a third of the amount because dried herbs have a stronger flavor.
- To make gluten-free popovers, simply replace all-purpose flour with gluten-free all-purpose flour and add ¼ teaspoon xanthan gum.
Do You Need A Popover Pan To Make Popovers?
Not necessarily!
But to make tall popovers, yes! The popover pan wells are deep and have straight sides, forcing the batter to rise upward while baking. The result is popovers with puffy tops and crispy sides.
Moreover, the pan has the popover cups welded to the wire rack, promoting even circulation of air and heat around the cups.
Can you make popovers in a muffin pan?
Yes, you can! But the result won’t be the same. The popovers will be smaller and denser.
Our popover recipe makes enough batter for either a 6-cup popover tin or a standard 12-cup muffin tin.
Make sure to reduce the baking by 5 minutes at the higher temperature and also 5 minutes at the lower temperature if using a muffin tin instead.
Ours is different from the Martha Stewart, Alton Brown, or Ina Garten popover recipe.
Gluten-Free Popovers
To make gluten-free popovers, simply replace all-purpose flour with gluten-free all-purpose flour and add ¼ teaspoon xanthan gum.
Easy Popover Recipe Variations
Savory:
- Cheese popovers – add grated Parmesan cheese or shredded gruyere to the batter (mix it, don’t blend!).
- Garlic and herb popovers -- Stir in ½ teaspoon garlic paste (chop and paste the garlic) and ⅓ to ½ teaspoon of your favorite dried herb into the batter for added flavor. You can also add ground black pepper to the batter!
Sweet:
- Brush the tops with melted butter and sprinkle cinnamon sugar or drizzle maple syrup.
- Serve popovers topped with whipped cream and fruits for dessert.
- Or dab butter and spoon jam into or on them.
How to Store and Reheat
Preferably eat them fresh! But you can store leftovers in an airtight container or freezer bag in the fridge for up to 2 days. Or freeze them for up to 2 months.
To reheat popovers:
- Chilled: Bake in a 350°F oven for about 5 minutes or until warm and crispy again.
- Frozen: Place the popovers directly from the freezer into a 350° F oven and bake for 8-12 minutes or until warm and crispy.
Can you make popover batter ahead of time?
There are differing opinions about this. Some think the batter can be prepared 15-60 minutes ahead of time and rest at room temperature before baking (or covered and chilled in the fridge overnight but left out on the counter while preheating the oven). Others think it shouldn’t!
The results are different and will depend on your preference.
Resting the batter makes a difference in the interior texture. If baked right away, with little gluten development, the batter is almost cake-like, with small bubbles and not much stretchiness.
In contrast, when left to rest, the batter will have a stretchy texture with a large bubble inside of the popovers, making it ideal for holding gravy and drippings.
What to serve with this Popovers Recipe:
- Instant Pot Potato Leek Soup
- Vegan Creamy Pumpkin Soup
- Panera Autumn Squash Soup
- Air Fryer Steak
- Bife à Cavalo (Steak and Eggs)
Other bread recipes to enjoy:
- No Yeast Bread Recipe
- Cheese Stuffed Garlic Bread Rolls
- Easy Plain and Garlic Naan Without Yeast
- Cheddar filled Brazilian Cheese Rolls
PIN & ENJOY!

Popovers
Equipment
- Popover tin
- baking sheet
- oven
- blender
Ingredients
- 4 large eggs at room temperature
- 1 ½ cups whole milk or 2% milk if you prefer
- ¾ teaspoon salt
- 1 ½ cups all-purpose flour For Gluten-free popovers, use the same amount of gluten-free all-purpose flour PLUS ¼ teaspoon xanthan gum.
- 3 tablespoon unsalted butter melted
- 1 teaspoon fresh rosemary leaves finely chopped (OPTIONAL). If you prefer to add dried herbs, you will need ⅓ teaspoon only. Thyme or Italian herbs make a great variation!
Instructions
- Place the oven rack in the bottom third position and remove the one above it so the popovers will have room to rise. Preheat the oven to 450°F (230° C). Then spray a 6-cup popover pan with no-stick cooking spray (or brush with olive oil) and place it on a baking sheet.
- Heat the greased pan in the oven for at least 2 minutes! To make Yorkshire puddings, use beef drippings to grease the pan instead.
- Meanwhile, blend eggs, milk, and salt in a blender until homogeneous (about 15 seconds).
- Add flour, blending until smooth (if making gluten-free popovers, add also xanthan gum). Then, pour in the melted butter and blend until frothy.
- Using a wooden spoon, mix in the herbs (do NOT blend). NOTE: If you prefer, you can prepare the batter in a medium bowl using a whisk. If you have time, let the batter rest at room temp for 15 minutes before baking; otherwise, bake it right away!
- Pour the batter evenly into the cups of the prepared pan, almost to the top.
- Bake popovers for 20 minutes without opening the oven door. Reduce the heat to 350°F (again without opening the door), and bake for an additional 18-20 minutes, or until they're tall, deep, golden brown on top, and have "popped" over the tops of the pan.
- Remove them from the oven and gently pierce the top of each with the tip of a paring knife, to release steam and help prevent sogginess.
- Slip them out of the pan, split open, and serve with butter and/or jam! They make a great side for soups too!
- NOTE: If using a regular muffin tin, this popover recipe makes 12 popovers instead of 6 when using a popover pan. But they won't be as tall and airy!
Recipe Video

Recipe Notes
- Chilled: Bake in a 350°F oven for about 5 minutes or until warm and crispy again.
- Frozen: Place the popovers directly from the freezer into a 350° F oven and bake for 8-12 minutes or until warm and crispy.
- Make sure to level the flour. This ensures you have the proper amount (neither more nor less).
- The eggs must be at room temperature!
- The whole milk should be lukewarm before mixing it into the batter. But if you forget, don’t fret! But make sure to preheat the greased popover pan in the oven before adding the batter to the pan! The heat (milk and/or pan) traps air which will expand, producing fluffy popovers.
- If you have time, allow the batter to rest at room temperature while the oven preheats. This makes popovers with an airier texture! In addition, it allows the starch molecules to expand and the gluten to relax. But if you are in a rush, go ahead and bake the popover right away. If making gluten-free popovers, skip this because there is no gluten to relax!
- Spray the tin very well (well and tops) with nonstick spray, preventing them from sticking in the pan.
- Position an oven rack on a lower third shelf and remove the rack above it, leaving room for the popover to rise dramatically without getting their tops burned.
- Don’t open the oven door while they’re baking. This could cause them to deflate! Turn on the oven light and take a peek at the last 5-10 minutes. If they are browning too much, open the door quickly to place a cookie sheet on a top oven rack in order to shield the tops of the popovers from the heat.
- Pierce the tops with a pairing knife to let the steam escape once they’re done baking. This will prevent sogginess!
- You can add grated cheese (e.g. Parmesan or gruyere) to the batter to make cheese popovers. But do not blend it! Mix it in with a wooden spoon. The same goes for fresh or dried herbs such as thyme, rosemary, Italian seasoning, etc.
- If replacing fresh herbs with dried herbs, use a third of the amount because dried herbs have a stronger flavor.
- To make gluten-free popovers, simply replace all-purpose flour with gluten-free all-purpose flour and add ¼ teaspoon xanthan gum.
Nutrition
** Nutrition labels on easyanddelish.com are for educational purposes only. This info is provided as a courtesy and is only an estimate, since the nutrition content of recipes can vary based on ingredient brand or source, portion sizes, recipe changes/variations, and other factors. We suggest making your own calculations using your preferred calculator, based on which ingredients you use, or consulting with a registered dietitian to determine nutritional values more precisely.
Please note that health-focused and diet information provided on easyanddelish.com is for educational purposes and does not constitute medical advice, nor is it intended to diagnose, treat, cure, or prevent disease. Consult with your doctor or other qualified health professional prior to initiating any significant change in your diet or exercise regimen, or for any other issue necessitating medical advice.

Leave a Reply