
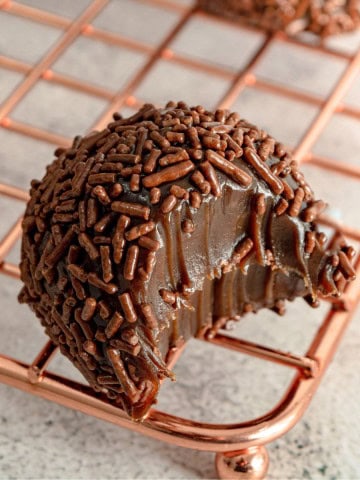
Brazilian cheese bread (pão de queijo recipe) is a small gluten-free baked cheese roll eaten for breakfast or as a snack in Brazil.
 is a small gluten-free baked cheese roll eaten for breakfast or as a snack in Brazil.")
Making this pão de queijo recipe requires no special occasion in my household. Indeed, Brazilian cheese bread has been part of our table for years.
There are a lot of different recipes, in which the ingredients vary -- as well as the final results. However, what really sets pão de queijo apart from other breads is the manioc starch (tapioca flour) and cheese.
It is in fact the lightness of the manioc starch, which is finely milled, that gives the bread such a special texture. Because the manioc starch, tapioca flour or tapioca starch is gluten-free, this cheese bread is ideal for consumption by those on gluten-free diets.
In Brazil, the cheese of choice is most frequently either Minas cheese or Parmesan cheese, although one can use other types such as mozzarella.
Elise Bauer from Simply Recipes, for example, uses the Mexican queso fresco cheese in her Brazilian cheese bread recipe and makes a kitchen-blender version.
 is a small gluten-free baked cheese roll eaten for breakfast or as a snack in Brazil.")
Mine is the traditional pão de queijo or Brazilian cheese bread because of the labor involved, and which yields a roll with a denser, chewier texture. Oh, can you smell it baking already?
How To Make Brazilian Cheese Bread (Pão de Queijo)
- Preheat oven to 375°F. Line a baking sheet with parchment paper. In a pan over medium heat, combine oil, water, milk, and salt. Simmer the mixture. Then, let cool down a little bit.
- Pour warm mixture over the tapioca flour in a large bowl, mixing well with a wooden spoon. Then, wait for the dough cool down. Add the egg and knead well with hands.
 is a small gluten-free baked cheese roll eaten for breakfast or as a snack in Brazil.")
Summarize and send this content on
- Add the cheese and mix well. The more homogeneous the dough, the better -- but also the more difficult to roll. Let Brazilian cheese bread rest for about 15 minutes at room temperature. Grease your hands with oil before rolling into balls. Use a tablespoon as measurement.
 is a small gluten-free baked cheese roll eaten for breakfast or as a snack in Brazil.")
- Either easily freeze them for up to 30 days or bake them for 18-20 minutes or until lightly golden. Serve immediately!
NOTE: To cook pao de queijo from frozen, place them 1-inch apart in a lined baking sheet and bake at 375 F for 25-30 minutes, or until lightly golden brown.
Variations
- You can make this pao de queijo recipe in other flavors such as roasted bell pepper Brazilian cheese rolls.
- For this, add ½ to 1 cup of blended roasted red bell peppers to this recipe or ½ cup of chopped fresh herbs. Because bell peppers contain water, it will take longer to bake. Serve with savory spreads or butter.
- You can also make this cheddar filled Brazilian cheese bread , these hot pockets, and tapioca breadsticks.
Accompaniments
Serve the plain pão de queijo or Brazilian cheese bread with savory spreads, butter, soft cream cheese, jams, nutella, dulce de leche, or guava paste. This is actually very common in Brazil. I like to spread sweet potato jam in mine. It is a hit in Rio and all over Brazil!
How to Store Brazilian Cheese Bread
If not baking these right away, freeze Brazilian cheese bread in a sealable plastic bag for up to 30 days. Bake directly from frozen. It is one of those traditional Brazilian foods and also easy Brazilian recipes you must try!
PIN & ENJOY!

Gluten-Free Brazilian Cheese Bread
Ingredients
- ⅓ cup vegetable oil
- ½ cup water
- ½ cup whole milk
- ½ teaspoon salt
- 2 cups tapioca flour
- 1 large egg at room temperature
- 1 ¼ cup grated Parmesan cheese
Instructions
- Preheat oven to 375°F. Line a baking sheet with parchment paper.
- In a pan over medium heat, combine oil, water, milk, and salt. Simmer the mixture. Then, let cool down a little bit.
- Pour warm mixture over the tapioca flour in a large bowl, mixing well with a wooden spoon. Then, wait for the dough cool down. Add the egg and knead well with hands.
- Add the cheese and mix well. The more homogeneous the dough, the better -- but also the more difficult to roll. Let rest for about 15 minutes at room temperature.
- Grease your hands with oil before rolling into balls. Use a tablespoon as measurement. Either freeze them for up to 30 days or bake them for 18-20 minutes or until lightly golden. Serve immediately!
- If baking from frozen, baking time will increase to 25-30 minutes.
Recipe Notes
- Variation: ½ to 1 cup of roasted red bell peppers can also be blended with the other ingredients in the blender, or ½ cup of fresh basil leaves. Because bell peppers contain water, it will take longer to bake. They can be served with savory spreads or butter.
- Suggested accompaniments: The plain pão de queijo or Brazilian cheese bread can be served with savory spreads, butter, soft cream cheese, jams, nutella, dulce de leche, or guava paste. This is very common in Brazil. I spread a sweet potato jam and also a berry jam on mine, as you can see.
- Do you love pao de queijo? Try also our Cheddar filled Brazilian cheese rolls!
- STORAGE: if not baking these right away, freeze them in a sealable plastic bag for up to 30 days. Bake directly from frozen.
Nutrition
** Nutrition labels on easyanddelish.com are for educational purposes only. This info is provided as a courtesy and is only an estimate, since the nutrition content of recipes can vary based on ingredient brand or source, portion sizes, recipe changes/variations, and other factors. We suggest making your own calculations using your preferred calculator, based on which ingredients you use, or consulting with a registered dietitian to determine nutritional values more precisely.
Please note that health-focused and diet information provided on easyanddelish.com is for educational purposes and does not constitute medical advice, nor is it intended to diagnose, treat, cure, or prevent disease. Consult with your doctor or other qualified health professional prior to initiating any significant change in your diet or exercise regimen, or for any other issue necessitating medical advice.
Last updated: [last-modified]


Martina says
I tried this recipe and it didn’t work out. I did something wrong since everyone else has had a good outcome. I let the liquids simmer, after cooled down I added it to the starch but it was too much liquid to dry ratio and it looks like milk.
Am I supposed let the liquids reduce some?
Valentina Dimitrova says
Hi Martina! I see. Yes, you should simmer the liquids and let them cool slightly (it should be lightly hot) before adding to the tapioca flour/starch. Mix the mixture very, very well and then let sit for a few minutes (I would say around 10-15 minutes before adding the eggs and then the cheese. Mix again very, very well. You will have a consistent dough, enough to form into small balls. The tapicoa will absorb most of the liquids while the mixture is resting. That mixture will be super gooey and thick and not hot anymore otehrwise the eggs will curdle. Once you add the eggs and cheese, it will get solid enough to roll into balls. Please grease your hands lightly with oil. The thing is the whether may cause some variations in the consistency. But if you don't get a dough at the end that can be rolled into balls, you sould add more cheese or more tapioca flour and knead the dough well. I hope this helps in your next attempt!
Erica says
Hi Denise! I finally made these and they came out great! Really easy to make and mixing the azedo with the doce was perfection. I do have a question though - I put the unbaked rolls in the freezer and was wondering when I take them out to bake, should I let them thaw a little? Or would it be alright to pop into the oven immediately? Thank you!
Valentina Dimitrova says
Hi Erica! I am so glad you made these and enjoyed. If not baking these right away, freeze Brazilian cheese bread in a sealable plastic bag for up to 30 days. Bake directly from frozen.
Erica says
Hello Denise! I am just dying to try this recipe! I have some questions though! I've been doing some research on the pão de queijo and many places say to use polvilho doce. But, I read somewhere that the polvilho azedo is how these cheese balls are traditionally made. Which one do you recommend using with your recipe? And, is it possible, if you use sweet, to substitute it with the sour? Would it change the other ingredients' quantities?
Thank you so much for this awesome recipe!
Valentina Dimitrova says
Hi Erica! Thanks for stopping by. The traditional pao de queijo takes a mixture of both polvilho doce and azedo. Of course, if the recipe takes only one of them, it will be just fine. The polvilho azedo is quite hard to find in the USA, this is why most of my recipes are made with the polvilho doce only, which here is known as tapioca flour and is available at any local supermarket. The difference is most in flavor. The pao de queijo made with polvilho azedo has a slightly sour taste. That's all! Recently, I published a recipe for pao de queijo with only 3 ingredients that takes polvilho doce, sour cream, and cheese only. It was quite successful as the sour cream also gives a sour flavor to that recipe. If you would like to try, here is the link: https://www.easyanddelish.com/eggless-brazilian-cheese-bread/
Erica says
Thanks for the quick response, Denise! That makes total sense! I do want to try it with both the polvilho doce and azedo. I think Amazon will provide both very easily! I remember when I had the pao de queijo, it had a slightly sour tang to it and it complimented well with the cheese. Is it possible to use your recipe with both the doce and azedo? So 1 Cup each for doce and azedo? Thank you so much for answering my questions!
Valentina Dimitrova says
No problem Erica! Yes, you can use 1 cup each. But make sure to sift the polvilho azedo first and then measure 1 cup. If you don't sift it, your pao de queijo will have hard lumps or a granulated texture that you don't want to. The reason why is because differently from the polvilho doce that has a fine texture, polvilho azedo has a cooarse, granulated texture.
Erica says
Fantastic! Thank you so much, Denise! I will try it out and let you know my results! And, the 3 ingredients one you linked is fascinating! I'll try that one after I get over this hurdle! Again, thank you for this amazing recipe and your guidance!
Erica says
Fantastic! Thank you so much for your help and this awesome recipe, Denise! I'll definitely give the polvilho azedo a good sifting before measuring the 1 Cup. I'll let you know of my results! The 3 ingredient cheese bread you linked previously seems almost too good to be true! I'll try that out after this one! Thank you again!
Valentina Dimitrova says
My pleasure. When you make them, please stop by to give me your feedback and rate the recipes. Thank you and enjoy! Have a great weekend.
MarkP says
Denise, thanks for the info on using polvilho doce and azedo. I have been making pão de queijo for years with a recipe I developed, but only using tapioca flour (doce). One of our international markets just started carrying Amafil brand povilho azedo, so I picked up a kilo for next time I make pão de queijo. My Brazilian wife says something the one I make is missing 'something', and I told her it might be the 'sour'. I'll try half tapioca flour and half polvilho azedo and see how it turns out.
I'm thinking that maybe some citric acid might work, too, I would just have to figure out the amount.
Anyhow, great blog!
Valentina Dimitrova says
Hi Mark!Yes, traditional pao de queijo has a mild sour flavor due to the 'polvilho azedo' or sour starch. This starch also gives Brazilian cheese bread a denser and chewier texture, while the polvilho doce makes it lighter and airy.
If you can't find polvilho azedo, you can add about 1-2 tbsp of sour cream to the recipe when adding the eggs. However, if you do find the sour starch, be sure to sift it first and then measure it. If you want to use both polvilho doce and azedo, I would recommend using 1 cup of each for this recipe (equal amounts). I hope this helps!
MarkP says
Obrigado, Denise, your advise is very helpful. I was wondering about the azedo because it is quite a bit coarser, so sifting seems about right. I'll probably make some tonight and see how it turns out.
MarkP says
Hello Denise,
I picked up some polvilho azedo a few months ago when one of our markets started carrying it. I finally got around to using it last night and followed your advice of half azedo and half regular tapioca starch/flour, using the recipe I developed. My wife says it is just like the pao de queijo she grew up with. I used some sharp cheddar this time with the parmesan and it worked very well. It definitely had a funky smell when mixing it, but the end result was perfect. I did a double batch (10 cups of flour!) because she wanted it for an office potluck.
Valentina Dimitrova says
Hi Mark! I am so glad it turned out just teh way your wife remembers having pao de queijo in Brazil. I bet it brought her some nostalgia. Thank you for your feedbacka dn happy holidays!
JB says
These are to die for. Once you eat one, it is hard to stop.
Alex Ribeiro says
I'm in love with this recipe, I try to do at home
Valentina Dimitrova says
Thank you! I hope you try both and enjoy. One is quick and made in the blender, and the other is more the traditional way to make pao de queijo. 😉
Julio Navarrete says
I will advise to not use Milk, oil or even less hot ingredients. Make it simple and easier...:
400gr Tapioca starch
150gr grated cheese
teaspoon salt
2 eggs
some yeast to help blow.
300ml cold water
It's more healthy and easier...same taste and same looking as all recipes above.
Enjoy it
Quinny says
hi, I can find sour tapioca Starch here but i cannot find the sweet tapioca starch, you mentioned about the manioc starch above, did you mean sweet tapioca starch = manioc starch one? Thank you
Valentina Dimitrova says
Yes, Quinny! The manioc starch is the same as sweet tapioca starch which is available at both Latin and Asian stores.
Quinny says
Thank you, I got it today. Very hard to find sweet one but there are so many manioc here. Will try your recipe and let you know
Valentina Dimitrova says
Success and enjoy!
Quinny says
I love this,will try to buy two kind of tapioca starch but not sure if I can find some,I'm living in Boston,do u have any idea where can I buy them?thanks
Valentina Dimitrova says
Hi, Quinny! Welcome to FBTY! Both the manioc starch and sour starch are available in Latin markets and online. If you do intend to make the quick recipe, you'll need the manioc starch only which can be bought here: https://www.amazon.com/Manioc-Starch-Polvilho-17-6oz-GLUTEN-FREE/dp/B005DSL04O/ref=sr_1_fkmr1_2?ie=UTF8&qid=1379468987&sr=8-2-fkmr1&keywords=yoki+tapioca+flour
But if you intend to make the traditional version, you'll need to buy both the manioc starch and the sour starch (https://www.amazon.com/Sour-Starch-Polvilho-Azedo-GLUTEN/dp/B005CBRPIW/ref=sr_1_1?ie=UTF8&qid=1379469252&sr=8-1&keywords=yoki+tapioca+flour ). Please, do not forget to sift the sour starch before adding to the recipe. I hope this help. Have a great week!
Cynthia says
Amei suas duas receitas!!! Fico louca quando peço receitas de pao de queijo às minhas amigas e elas me dao as instrucoes como "um copo raso", "meio copo"... Moro nos EUA e estou acostumada com a precisao das receitas americanas, e tudo em cups e nao em copos. Quando vejo receitas em "copos" me pergunto: "mas copo de que tamanho?????" rsrsrs
Obrigada pelas receitas, vou testar as duas! Estou animada sobre a de liquidificador, pois cresci minha infancia toda comendo este, da versao mais facil! Adorei!
Bjs!
Valentina Dimitrova says
Cynthia: Bem-vinda a FBTY!!! Eu entendo. Como também estou acostumada a medidas precisas, não consigo fazer as receitas brasileiras sem que algo saia errado. 🙂 FBTY é o meu projeto de pôr por escrito receitas brasileiras corretas. Quando vejo receitas de livros ou sites brasileiros, sei que o copo é de 250 ml enquanto que o nosso que moramos aqui nos EUA é de 240 ml ou 8 oz. Mesmo assim, falta precisão na maioria das receitas brasileiras. Espero que usando as minhas receitas você consiga fazê-las sem problema. Se houver alguma dúvida, é só falar que terei prazer de te ajudar. Um abraço!
Sania says
This bread knocked my socks off
ubar leat says
Thanks for the recipe! Love it.
Valentina Dimitrova says
We're welcome. Glad that you liked my article. Good luck on your presentation!