
Coxinha is a popular Brazilian street food that consists of a dough shaped into a little drumstick filled with well-seasoned shredded chicken, breaded, and then deep-fried until crispy and golden brown. They are the most famous Brazilian chicken croquettes (a national culinary marvel)!

[toc]
HOW TO MAKE COXINHA (CHICKEN CROQUETTES)
To make this traditional coxinha recipe, follow the steps below.
You will need to prepare the filling and the dough, shape them into small chicken drumsticks, bread them, and then deep fry them.
STEP 1: Prepare the filling
- Heat a large skillet over medium heat, add the oil, and then cook the onion, stirring now and then, until soft and translucent (about 2-3 minutes). Add the garlic and cook for about 1 minute.
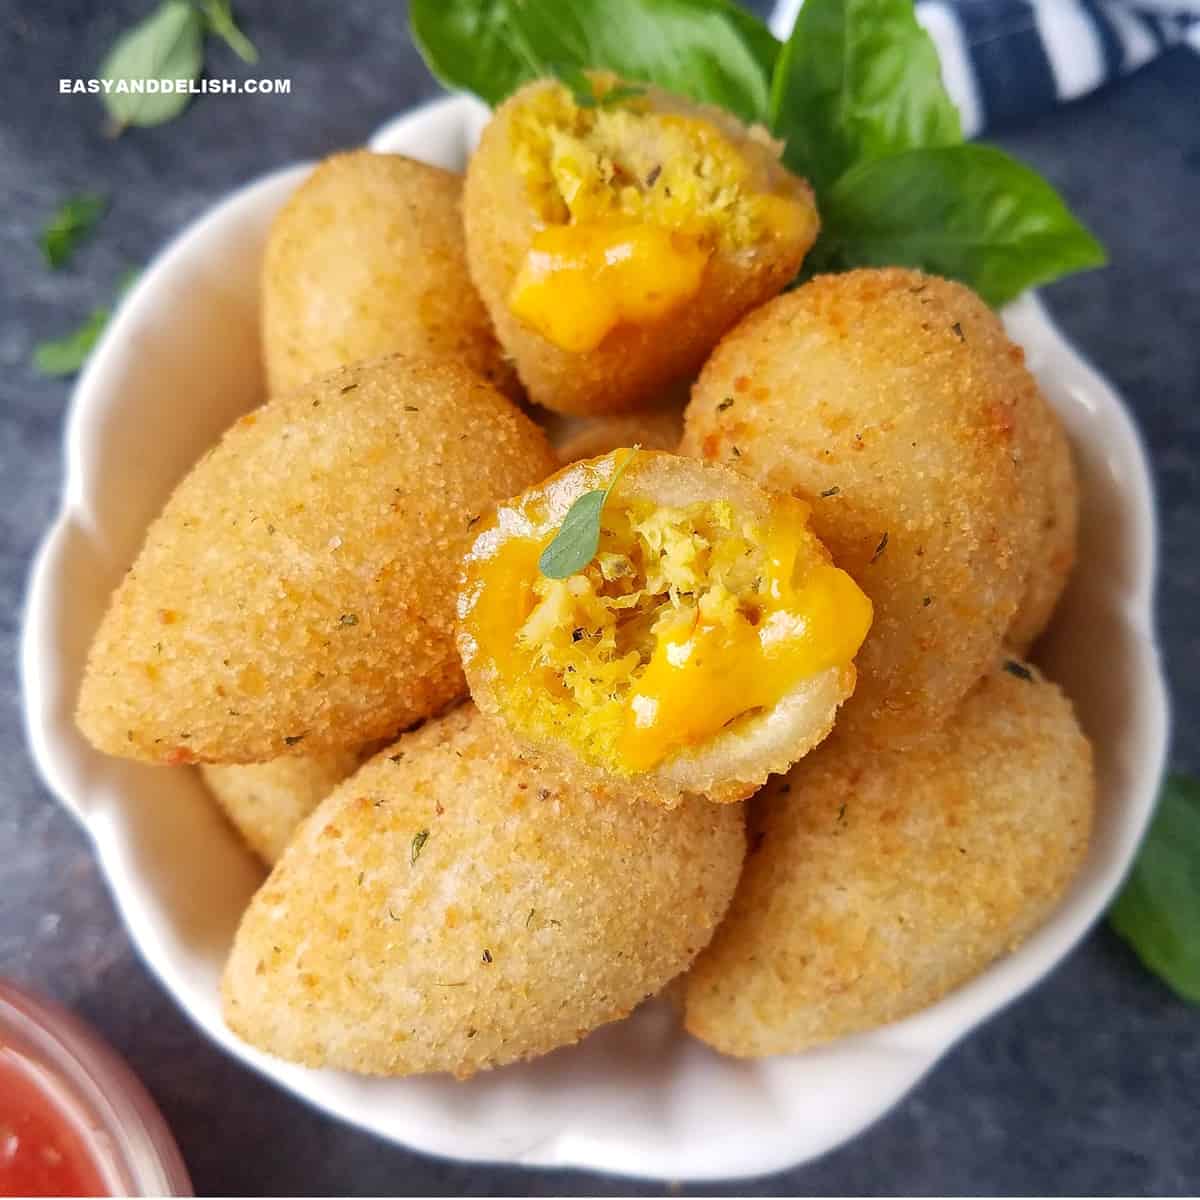
- In a large bowl, place the finely shredded chicken and stir in the cooked onion and garlic mixture, salt, pepper, red pepper flakes (optional), mayonnaise or Catupiry cheese, and green onions or chives. Set aside! NOTE: If desired, the coxinha filling can be prepared 1 or 2 days ahead and refrigerated in an airtight plastic container.
STEP 2: Prepare the coxinha dough
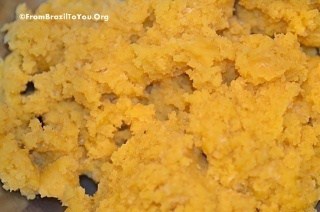
- In a large, non-stick saucepan, place the chicken broth (liquid), salt, annatto or turmeric (optional), and olive oil, and bring to a simmer over medium-low heat. When the stock is hot, add the sifted flour all at once while stirring very well. It will get more and more difficult to stir, but continue to stir vigorously for about 1 minute or so until obtaining a uniformly lumpy dough.
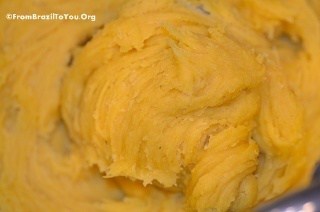
- Remove from the heat and transfer the dough to an electric mixer fitted with a hook attachment. Knead the dough at speed "2" for about 5 minutes or until it becomes soft and smooth (NOTE: If you don't have a mixer with a hook attachment, let the dough cool enough to handle and knead by hand very well).
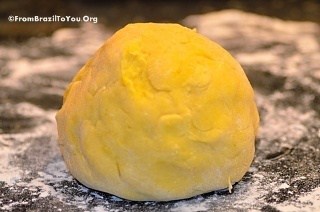
- Scrape the dough from the mixing bowl onto a well-floured surface with a dough scraper or spatula, and knead the ball of dough a little bit more by hand. Shape the savory dough into a flat disk and let rest for 5 to 8 minutes at room temperature.
- Using a rolling pin, roll out the dough onto a well-floured surface until it is about ¼ to ⅛-inch thick. Using a 3¼-inch round cookie cutter, cut out disks of dough and place them on a baking sheet lined with parchment paper (a metal spatula can be useful to help pry the disks from the rolling surface). Aggregate the dough leftovers, re-roll, and cut out more disks. With the ⅛-inch thick dough, I was able to cut about 34 disks.
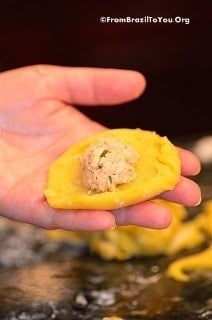
- Scoop about 1 tablespoon of the chicken mixture onto the center of each disk.
STEP 3: Shape the coxinha dough and filling into a drumstick shape
- Lightly oil your hands and shape the filled disks into drumsticks. First, fold the dough up and around the filling to form a U-shape, like a taco.
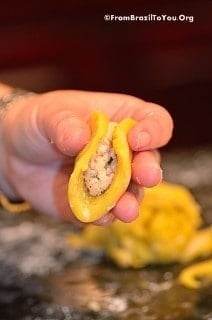
- Next, bring up the dough along the two open sides to enclose the dough in a beggar's purse shape.
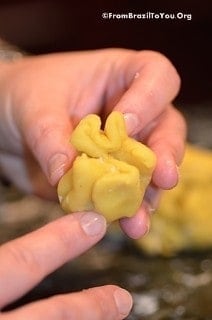
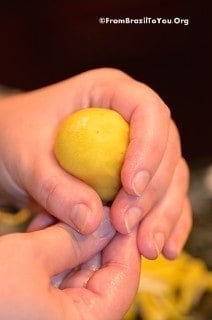
- Now, form the neck of the coxinha between your encircled index finger and thumb, and gently press the filling down into the center as you close.
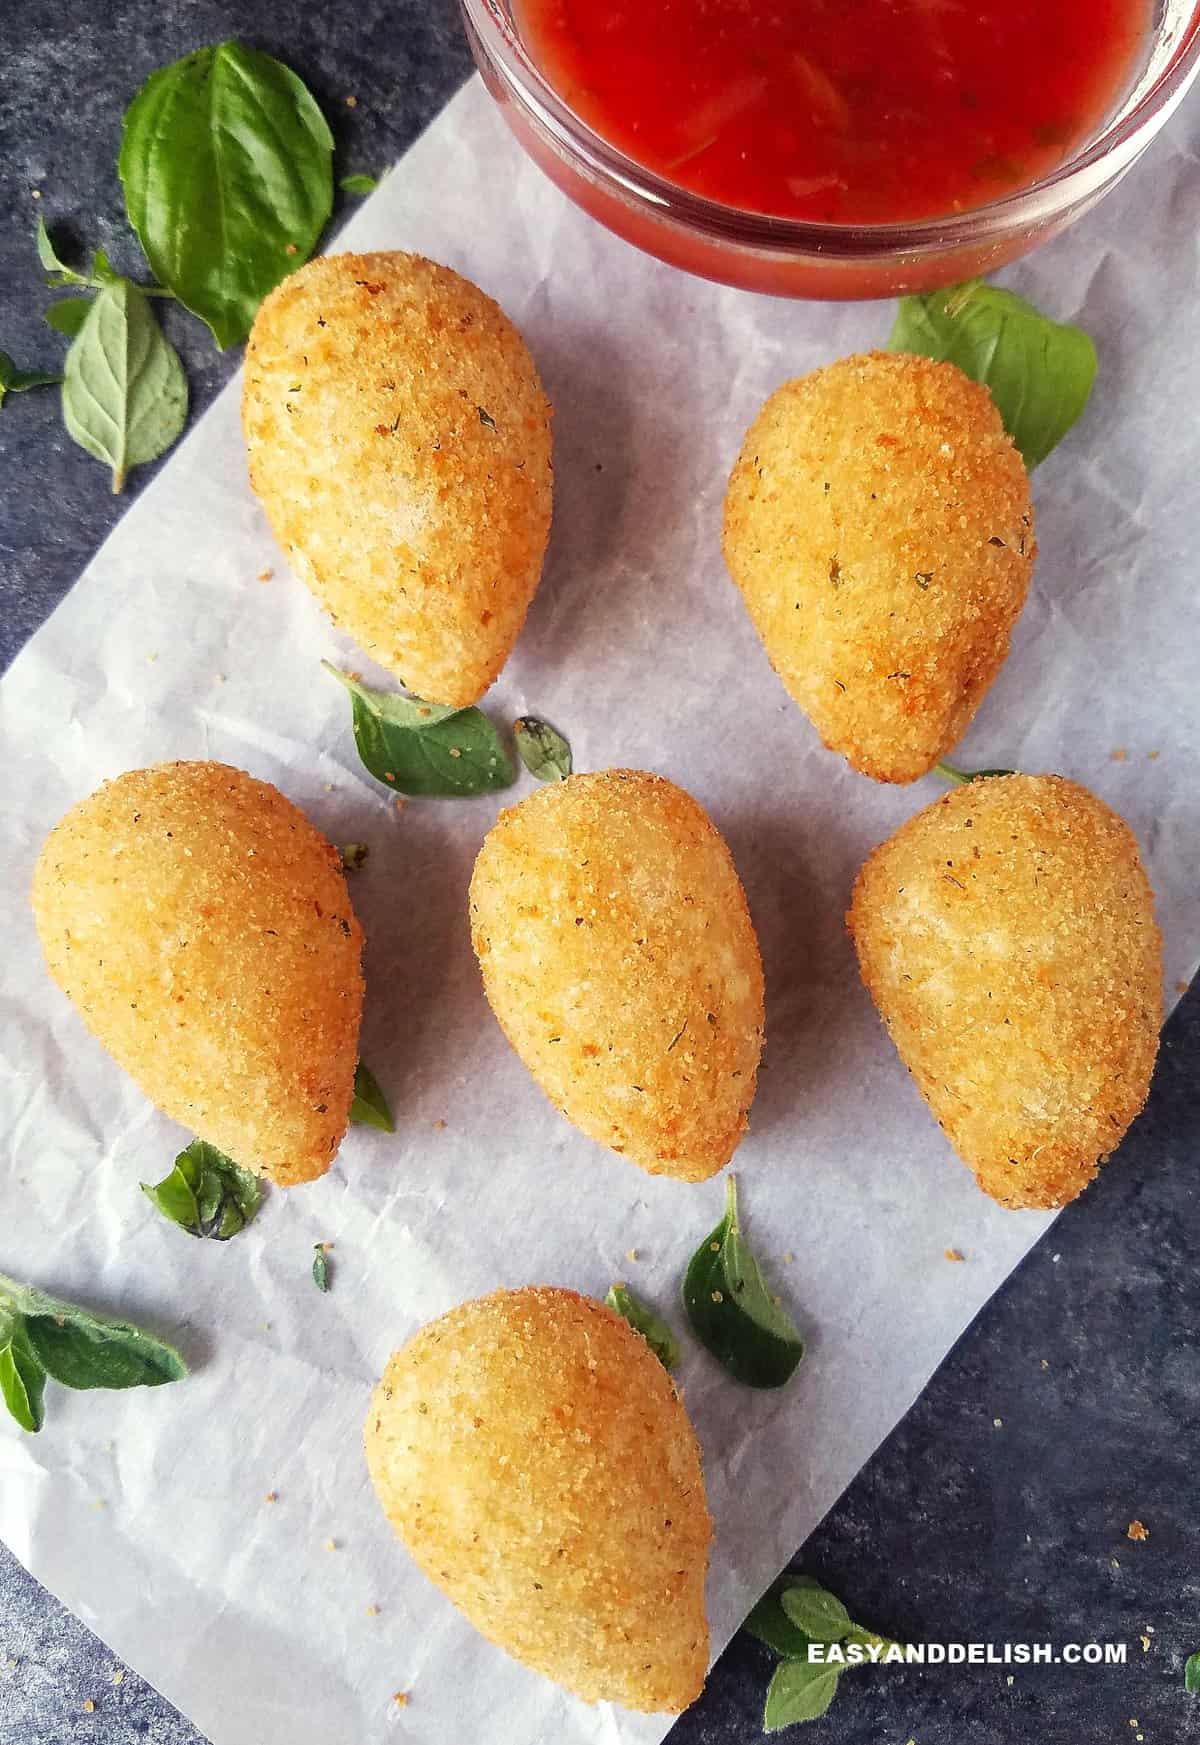
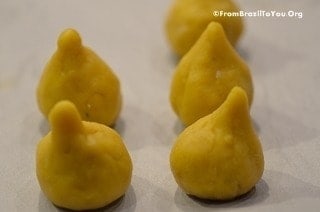
- Pinch and seal the edges. Pull the dough at the top out slightly so that it resembles a drumstick without the bone (that is, like a pear or teardrop shape).
- Use a moist towel to clean your fingers off each time they touch the filling. Make sure the dough has no cracks; if it does crack, wet your fingers in water and pinch the dough together. Flatten the rounded bottom of the coxinhas very minimally with the palm of your hand (just enough that they will be able to rest upright), and place the shaped coxinhas on a baking sheet lined with parchment paper.
STEP 4: Dredge coxinhas
- Prepare 3 separate bowls for the all-purpose flour, half of the egg whites (i.e., 4 egg whites mixed with 1 teaspoon of water), and half of the breadcrumbs (i.e., about 1-½ cups of breadcrumbs).
- Pass the fritters through each bowl (flour, egg whites, and then breadcrumbs), shaking off any excess. The egg whites and breadcrumbs are divided for use in half-quantities because eventually, the bowl of whites will accumulate excess flour, and the crumbs will accumulate excess whites. Both will need to be replaced to maintain an effective coating of the coxinhas as they are dredged.
STEP 5: Fry coxinhas
- Pour enough vegetable oil into a frying machine or heavy-bottomed pot. Heat to 350 degrees F (180 degrees C). If you don't have a thermometer to measure the temperature, dip a small piece of the dough into the heated oil. If you hear a sizzling sound, the oil is ready.
- Fry the fritters in batches. Please, do not place too many coxinhas or chicken croquettes in at the same time because this will lower the temperature, making the fritters oily. Make sure to turn all sides while frying the fritters so that they will brown evenly.
- Transfer each coxinha to a baking sheet lined with a double sheet of paper towels to absorb any excess oil. To serve coxinhas warm, keep the finished batches in a warm oven until serving.
- Serve them by themselves or with a side of ketchup, lime wedges, rosé sauce, or chimichurri sauce.
WHAT IS COXINHA?
'Coxinha de frango' ( pronounced like koh-SHEEN-yah dee FRAHN-goo), also known as 'coxinha de galinha', originated in São Paulo about 2 centuries ago.
It has become one of the most popular appetizers in Brazil, including in Rio de Janeiro. It consists of dough, originally made with wheat flour and chicken stock, which is filled with seasoned shredded chicken, shaped into a little chicken drumstick, and then deep-fried.
Coxinha is a street food snack, although it is common in snack bars, bakeries, and cafés. It is also served at birthday parties and many other events as an appetizer.
Some may roughly call them Brazilian chicken balls, although "Brazilian chicken drumsticks" would be more appropriate.
I have been a fan of popular food for as long as I can remember, just like everyone else who has taken a bite of it. The thing is unforgettable!!
Moreover, it is both part of our easy Brazilian recipes and also traditional Brazilian foods.
Ingredients and Substitutions
For the coxinha filling
- 2 tablespoons olive oil (or mild vegetable oil)
- ½ cup yellow or white onion, finely minced
- 2 garlic cloves, finely minced
- 3 cups cooked chicken, finely shredded (you can use skinless baked chicken breast or rotisserie chicken
- Salt to taste
- Black pepper to taste
- 1 pinch of red pepper flakes, optional and only if you enjoy the heat
- 3 tablespoons mayonnaise (or if available, Catupiry cheese or Brazilian cheese spread - also called requeijão. Room temperature cream cheese is also a good substitute)
- 3 tablespoons minced green onions (or chives)
For the coxinha dough
- 3⅓ cups chicken broth, liquid
- A pinch of salt, enough to taste
- ¼ teaspoon annatto (or turmeric), optional
- 2 teaspoons olive oil
- 3 cups all-purpose flour, sifted
Dredging
- 2 cups all-purpose flour
- 8 large egg whites, divided
- 2-3 cups of breadcrumbs, divided
For frying
- Enough vegetable oil to fully immerse the coxinhas for deep frying (Canola oil is a great option because it has a high smoking point and a mild flavor)
TIPS FOR MAKING COXINHA RECIPE
- You can prep this dish one or two days in advance and fry them before serving.
- Make sure to knead the dough well until it is smooth (or it will present lumps of flour) and let it rest for about 10 minutes.
- It is key you roll out the dough to ¼ to ⅛-inch thick; otherwise, it will be hard to shape them into drumsticks. The thicker, the more difficult. In addition, you will bite into a small amount of chicken filling.
- Before breading the coxinhas, make sure there are no cracks in the dough; otherwise, they will split open while frying. To fix the cracks, wet your fingers in water and pinch the dough together.
- Although you can season the breadcrumbs with a pinch of salt and pepper, I prefer not because it may make the exterior too brown while frying.
- The amount of oil to fry them will depend on the size of your pan and how deep it is. But it has to be enough to cover the coxinhas. One thing is sure: if not using a frying machine, choose a heavy-bottomed pot that can resist high temperatures.
- Fry in small batches - do NOT overcrowd the pan, or you will decrease the oil temperature, rendering coxinhas with an oily exterior.
- If you don't find Catupiry cheese or requeijão, you may use room temperature cream cheese or mayo. In any case, the filling has to be moist. You don't want to bite into a dry filling, do you?
Variations
The most popular is the classic, coxinha de frango (chicken croquettes). But there are other common variations as follows:
Filling
The final name is determined by the filling:
- Coxinha de carne (ground beef croquette)
- Coxinha de camarão (shrimp croquette)
- Also, coxinha de palmito (heart of palm croquettes)
- Coxinha de carne seca ou carne de sol (shredded beef jerky croquettes), cheese coxinha, among others
Each of the above can be also filled with catupiry cheese which would be added to the name (i.e. coxinha de frango com catupiry, or chicken and catupiry croquettes).
In addition, some regional variations add another type of vegetable to the filling (some versions add peas, corn, mushrooms, etc) and even Auracaria nuts.
Dough
The classic is the one made with flour. But here are a few variations:
- Yuca dough coxinha (the main ingredient of the dough is mashed yuca or cassava)
- Potato dough coxinha (the main ingredient is mashed potatoes)
Recently, there has been a trend to use Brazilian cheese bread batter as the dough for coxinha. Some are even using brigadeiro dough to make a coxinha de morango (a fresh strawberry rolled in brigadeiro ). The latter is not served as an appetizer of course. It is a sweet treat!
Cooking Method
Although the traditional cooking method is deep-frying, you can alternatively bake or air-fry coxinhas. In these cases, they are called:
- Coxinha assada (baked coxinha)
- Coxinha na airfryer (Air fryer coxinha)
Is Coxinha a Croquette or a Fritter?
Both croquettes and fritters consist of small bites deep-fried in hot oil. This is why it can be so confusing!
The difference is:
- Croquettes are a piece of dough made with a binder (i.e., flour, mashed potatoes, etc) with a filling, which is breaded and then deep-fried (e.g, Brazilian coxinha).
- On the other hand, fritters consist of a portion of meat, seafood, fruit, or vegetable that has been battered or breaded and deep-fried, i.e,. American chicken nuggets. It can also be a portion of deep-fried dough without other ingredients, i.e., beignets.
Similar Foods
Coxinha is a type of croquette. No wonder you may find some other world dishes that share some similarities to the Brazilian croquette. Here are a few:
- Cuban croquetas (ham croquettes)
- Brazilian rissoles (it has a coxinha dough and can be filled with different fillings, but it resembles a mini breaded deep-fried empanada)
- Dutch kroketten (beef croquettes)
- Portuguese or Brazilian Cod Cakes (aka bolinho de bacalhau)
- Colombian papas rellenas (stuffed potato croquettes)
- Italian arancine (rice croquettes)

What to Serve with
Here are some options:
- Sauce- Some options are rosé sauce or chimichurri sauce.
- Condiment- Ketchup and/or mayonnaise are the staples in Brazil for this appetizer.
- Drink- Pair with a super cold beer, caipirinha, or guaraná soda (it tastes somewhat similar to Ginger Ale)
More Brazilian Appetizer Recipes (or Street Foods):
- Brazilian cheese bread (pão de queijo)
- Risoles
- Beef empanadas (pastel de carne)
- Shrimp mini pot pies (empadinha de camarão)
- Grilled cheese sticks
PIN & ENJOY!

Coxinha (Brazilian Chicken Croquettes Recipe)
Equipment
- 1 stovetop
- 4 bowls
- 2 Pans
- 1 Stand mixer
- 1 Rolling pin
- 1 Cookie cutter 3¼-inch round
- 1 baking sheet
- 1 frying machine
Ingredients
For the Coxinha Filling
- 2 tablespoons olive oil or a mild vegetable oil
- ½ cup yellow or white onion finely minced
- 2 garlic cloves finely minced
- 3 cups cooked chicken finely shredded (you can use skinless baked chicken breast, or rotisserie chicken
- Salt to taste
- Black pepper to taste
- 1 pinch of red pepper flakes optional and only if you enjoy the heat
- 3 tablespoons mayonnaise or if available, Catupiry cheese or Brazilian cheese spread - also called requeijão. Room temperature cream cheese is also a good substitute
- 3 tablespoons minced green onions or chives
For the Coxinha Dough
- 3⅓ cups chicken broth liquid
- A pinch of salt enough to taste
- ¼ teaspoon annatto or turmeric, optional
- 2 teaspoons olive oil
- 3 cups all-purpose flour sifted
Dredging
- 2 cups all-purpose flour
- 8 large egg whites divided
- 2-3 cups breadcrumbs divided
For Frying
- Enough vegetable oil to fully immerse the coxinhas for deep frying Canola oil is a great option because it has a high smoking point and a mild flavor
Instructions
Prepare the filling
- Heat a large skillet over medium heat, add the oil and then cook the onion, stirring now and then, until soft and translucent (about 2-3minutes). Add the garlic and cook for about 1 minute.
- In a large bowl, place the finely shredded chicken and stir in the cooked onion and garlic mixture, salt, pepper, red pepper flakes(optional), the mayonnaise or Catupiry cheese, and green onions or chives. Set aside! NOTE: If desired, the coxinha filling can be prepared 1 or 2 days ahead and refrigerated in an airtight plastic container.
Prepare the coxinha dough
- In a large, non-stick saucepan, place the chicken broth (liquid), salt, annatto or turmeric (optional), and olive oil, and bring to a simmer over medium-low heat. When the stock is hot, add the sifted flour all at once while stirring very well. It will get more and more difficult to stir but continue to stir vigorously for about 1 minute or so until obtaining a uniformly lumpy dough.

- Remove from the heat and transfer the dough to an electric mixer fitted with a hook attachment. Knead the dough at speed "2" for about 5 minutes or until it becomes soft and smooth (NOTE: If you don't have a mixer with a hook attachment, let the dough cool enough to handle and knead by hand very well).
- Scrape the dough from the mixing bowl onto a well-floured surface with a dough scraper or spatula, and knead the ball of dough a little bit more by hand. Shape the savory dough into a flat disk and let rest for 5 to 8 minutes at room temperature.
- Using a rolling pin, roll out the dough onto a well-floured surface until it is about ¼ to ⅛-inch thick. Using a 3¼-inch round cookie cutter, cut out disks of dough and place them on a baking sheet lined with parchment paper (a metal spatula can be useful to help pry the disks from the rolling surface).
- Aggregate the dough leftovers, re-roll, and cut out more disks. With the ⅛-inch thick dough, I was able to cut about 34 disks.
- Scoop about 1 tablespoon of the chicken mixture onto the center of each disk.


Shape the coxinha dough and filling into a drumstick shape
- Lightly oil your hands and shape the filled disks into drumsticks. First, fold the dough up and around the filling to form a U-shape like a taco.
- Next, bring up the dough along the two open sides to enclose the dough in a beggar's purse shape.
- Now form the neck of the coxinha between your encircled index finger and thumb, and gently press the filling down into the center as you close.
- Pinch and seal the edges. Pull the dough at the top out slightly so that it resembles a drumstick without the bone (that is, like a pear or tear drop shape).
- Use a moist towel to clean your fingers off each time they touch the filling. Make sure the dough has no cracks; if it does crack, wet your fingers in water and pinch the dough together. Flatten the rounded bottom of the coxinhas very minimally with the palm of your hand (just enough that they will be able to rest upright), and place shaped coxinhas on a baking sheet lined with parchment paper.

Dredge coxinhas
- Prepare 3 separate bowls for the all-purpose flour, half of the egg whites(i.e. 4 egg whites mixed with 1 teaspoon of water), and half of the breadcrumbs (i.e. about 1-½ cups of breadcrumbs).
- Pass the fritters through each bowl (flour, egg whites, and then breadcrumbs), shaking off any excess. The egg whites and breadcrumbs are divided for use in half-quantities because eventually, the bowl of whites will accumulate excess flour and the crumbs will accumulate excess whites. Both will need to be replaced to maintain an effective coating of the coxinhas as they are dredged.

Fry coxinhas:
- Pour enough vegetable oil into a frying machine or heavy-bottomed pot. Heat to 350 degrees F (180 degrees C). If you don't have a thermometer to measure the temperature, dip a small piece of the dough into the heated oil. If you hear a sizzling sound, the oil is ready.
- Fry the fritters in batches. Please, do not place too many coxinhas or chicken croquettes in at the same time because this will lower the temperature, making the fritters oily. Make sure to turn all sides while frying the fritters so that they will brown evenly.
- Transfer each coxinha to a baking sheet lined with a double sheet of paper towels to absorb any excess oil. To serve coxinhas warm, keep the finished batches in a warm oven until serving.
- Serve them by themselves or with a side of ketchup, lime wedges, rosé sauce, or chimichurri sauce.
Recipe Notes
Nutrition
** Nutrition labels on easyanddelish.com are for educational purposes only. This info is provided as a courtesy and is only an estimate, since the nutrition content of recipes can vary based on ingredient brand or source, portion sizes, recipe changes/variations, and other factors. We suggest making your own calculations using your preferred calculator, based on which ingredients you use, or consulting with a registered dietitian to determine nutritional values more precisely.
Please note that health-focused and diet information provided on easyanddelish.com is for educational purposes and does not constitute medical advice, nor is it intended to diagnose, treat, cure, or prevent disease. Consult with your doctor or other qualified health professional prior to initiating any significant change in your diet or exercise regimen, or for any other issue necessitating medical advice.
Did you make this recipe?
Comment and rate the recipe. Also follow us on Pinterest at @easyanddelish for more delish recipes.This post was first published on July 14, 2014.

Can there’s be baked? I just made some. I also made the flour with 1/2 reg four and 1/2 chickpeas and it was yummy . I would like to air fry them instead though . Would that be ok?
Hi Maricris! It is good to know you made them with a mixture of regular flour and chickpeas, something I have never tried. Yes, you can definitely air fried them. Make sure to spray them with some nostick cooking spray (I prefer avocado oil based because they have a neutral flavor and also a higher smoke point). This way they will get golden brown and won't stick in the air fry and also get crispy, getting a texture more similar to the deep-fried coxinhas. Also, make sure to preheat your air fryer for at least 5 to 10 minutes before air-frying your coxinhas. Do not fill your basket too much. Leave some space for teh hot air to circulate so they can cook evenly.
Thanks for the coxinha recipe.
I wonder is the dough(masa) for the coxinha is fully done on the inside after cooking/frying?
Hi, Glenn!
Once coxinhas are deep-fried, they get fully cooked both inside and out. Inside is soft and outside is crispy -- as any other fritter. I hope you try this recipe and enjoy. When I prepare them, I make enough to freeze... and even though, they disappear fast. These are my American husband fave fritters. Every time we travel to Brazil, he starts consuming them as soon as we arrive at the airport. 🙂
Your Coxinha de Frango look Terrific.
Thank you, Carrie!!!! This is a family fave. My husband is crazy for these fritters.
Wow, looks adorable lil fritter,
we used to had this kind of chicken fritter and its called ballen in Indonesia.
Wow, looks adorable lil fritter,
we used to had this kind of chicken fritter and its called ballen in Indonesia
How interesting, Dedy! It seems many different cultures have their own version of chicken fritters but there are a few similarities among them all.
I'm a huge sucker for fritters and this is no exception!!
Thank you, Kiran! Enjoy...
Another something new to me, love to learn all of this new food that I never heard or seen of now I am informed 🙂
Looks like a dumpling but South American style, love to try this someday
You won't regret, Raymund!
These fritters are amazing!
I have a serious love affair with cozinha!! I had them for the first time at a Brazilian girlfriend's house a few years ago and immediately asked how she made them. To my sadness, she said she got them from a Brazilian cater (here, in Holland!) and assured me they were impossible to make.
So now, naturally, I have to make some for her 🙂
Thanks Denise!
Thank you, Francesca! My husband and I are crazy for these coxinhas. Believe me: They are much easier to make than it looks. All the work involved pays off when one takes a bite. 🙂 After frying them and letting them cool down, you can freeze them in a ziploc bag. Before eating, place them onto a baking sheet lined with parchment paper at 350 F for about 8 to 10 minutes or until they are completely heated. In general, I make a large batch to save me time.
such a lovely way of making stuffed chicken fritters...the stuffing must taste awesome and the dough made with flour and broth must be flavorful too....can't think of a better time to snack on these little drumsticks...than now cause its quite cloudy outside...will be making some now by substituting chicken with textured soy mince...thanks for sharing this delicacy 🙂
My pleasure, Kumar!!!! Enjoy these stuffed with minced soy...Have a great week!